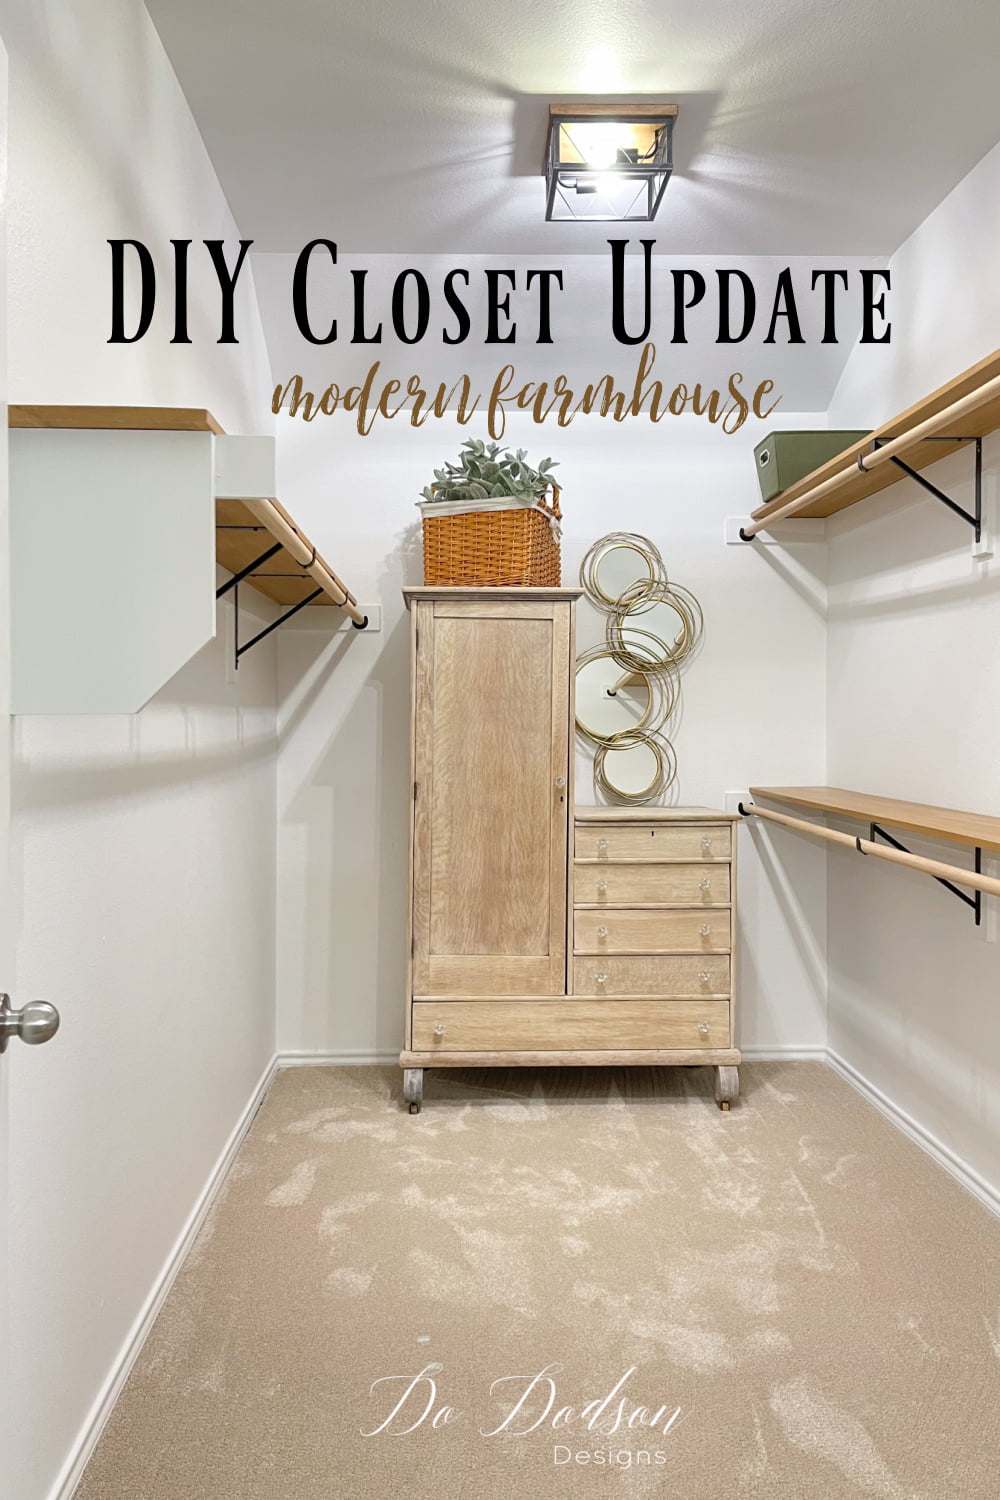
Why not give your closet some love? I’ve given a lot of attention to updating the rest of my home over the years but neglected our closet for way too long. Today, I’m sharing how we did an easy DIY closet update in one day. Now I’m in love with my builder-grade closet!
* As an Amazon Associate, I earn from qualifying purchases and through other companies as well. You are not charged extra to use any of the links, but any income I make helps me create more amazing DIY projects to share with you! To see my full disclaimer, click here!
DIY Closet Update With A Farmhouse Vibe
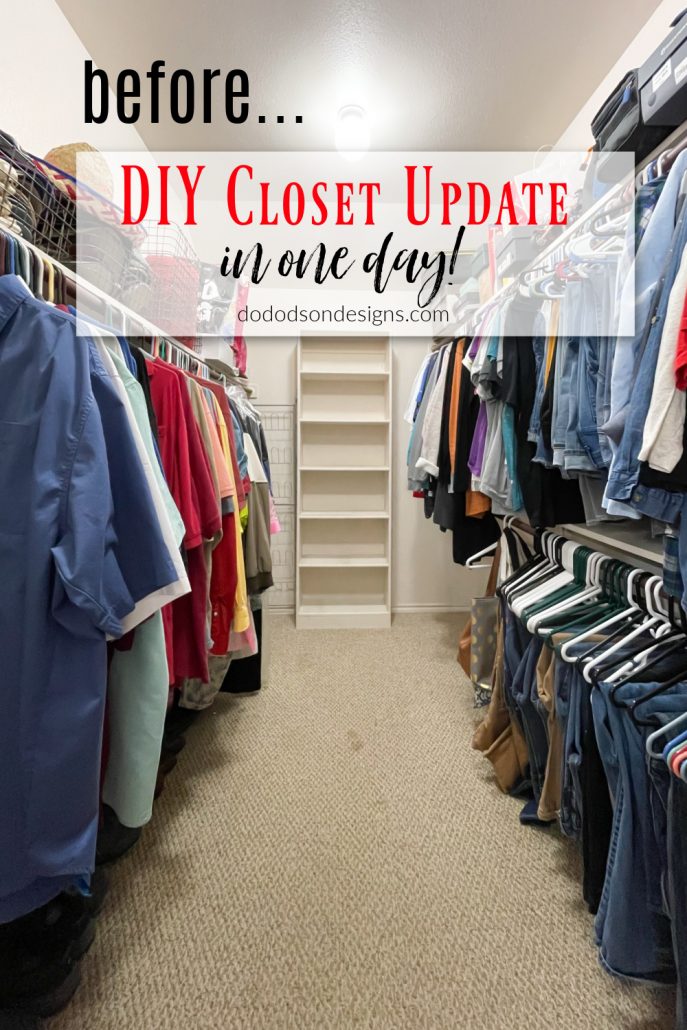
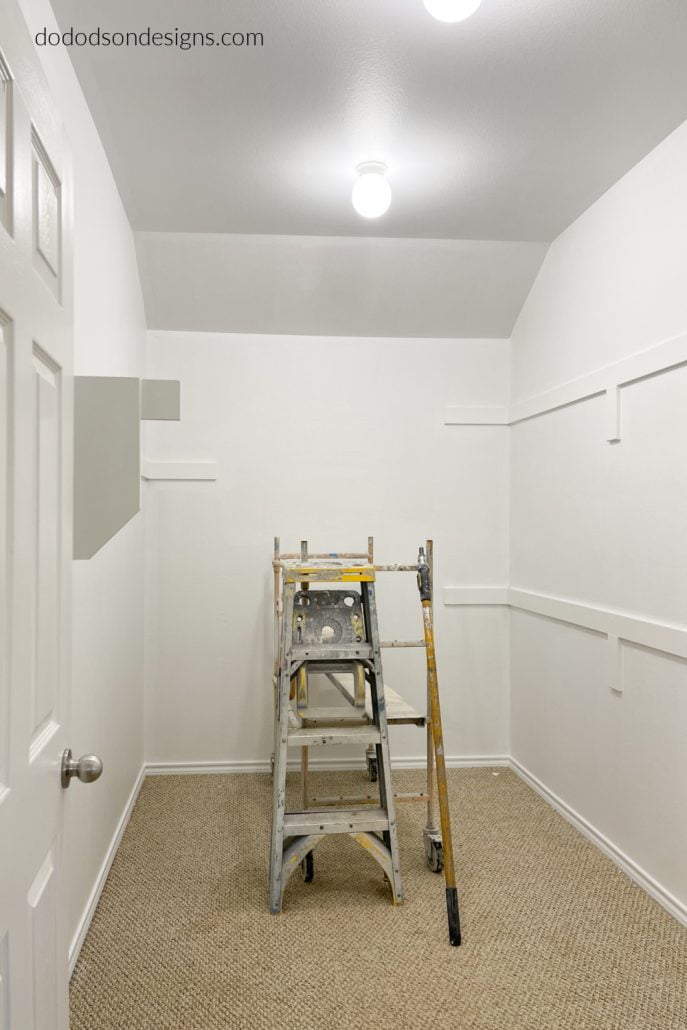
I like a great before and after photo, and this one tells a story—the story of a room in our home that no one wanted to see, including me. Don’t get me wrong, the size of our closet is perfect for just the two of us empty nesters, but the BOOB LIGHTS, down to the tiny (not even wood) shelving, weren’t doing it for me. We seriously needed a closet update.
The cheapo brackets supporting the shelves were not meant to support the amount of clothing WE both had accumulated through the years. It was seriously sagging and pulling away from the wall.

SUPPLY LIST:
- High Reflective White (wall and trim paint) SW 7757
- 1×12 Poplar Wood (for shelving)
- SurfPrep Sanding System (10% discount code DOIT10)
- Old Masters Gel Stain (oil-based) – Fruitwood
- Dixie Belle’s Gator Hide (topcoat sealer for the wood shelving)
- Synthetic Paintbrush (gives the best finish with Gator Hide)
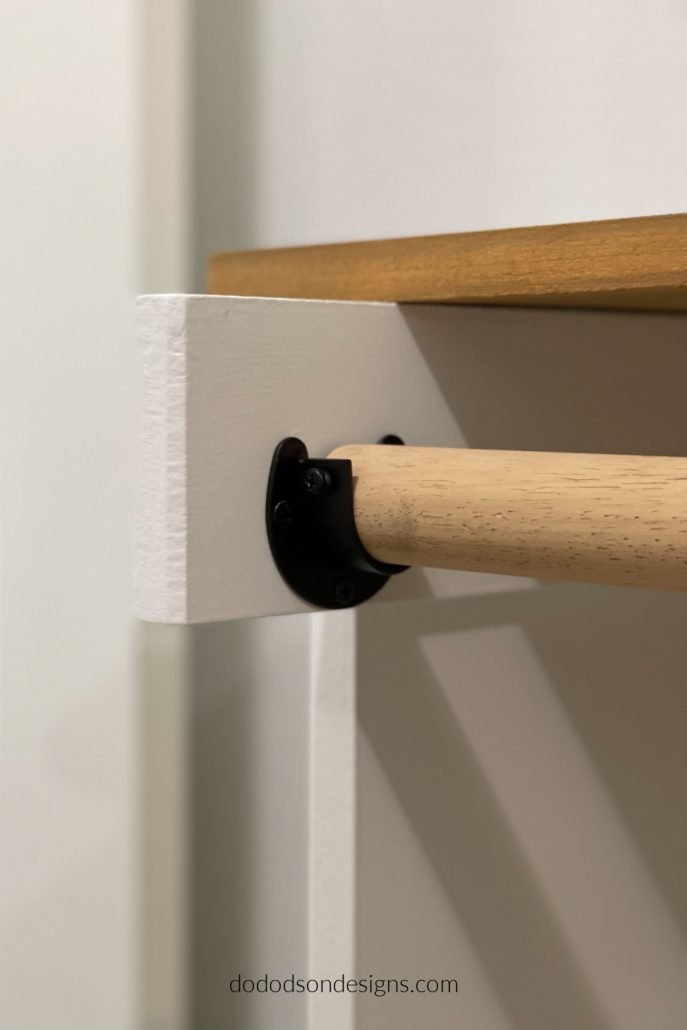
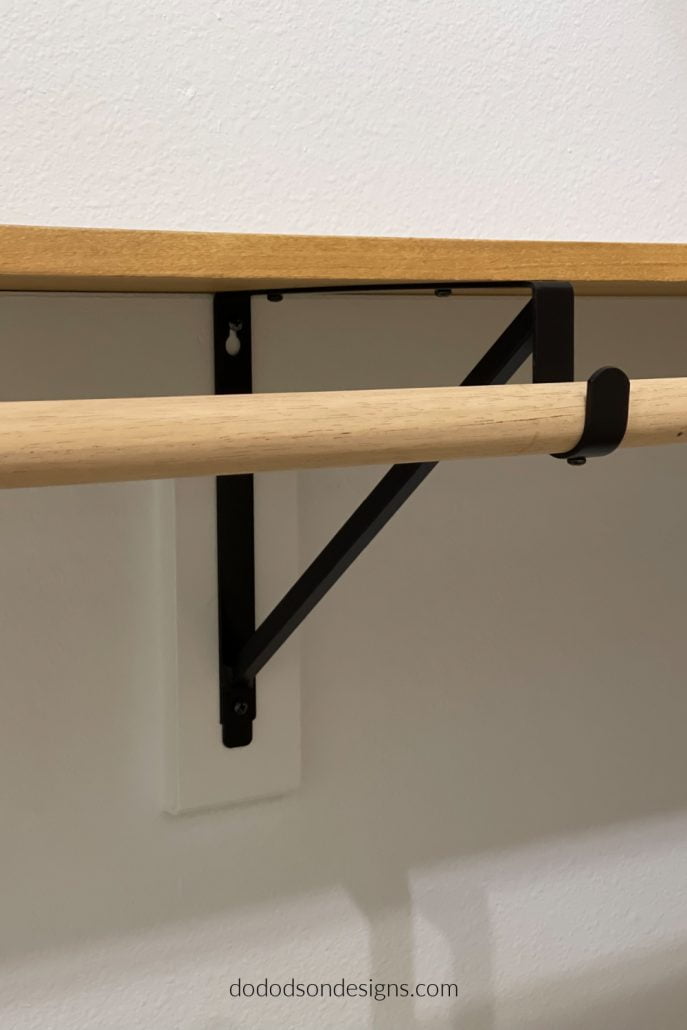
- heavy-duty black closet shelf bracket with rod support
- tape measure
- cordless drill
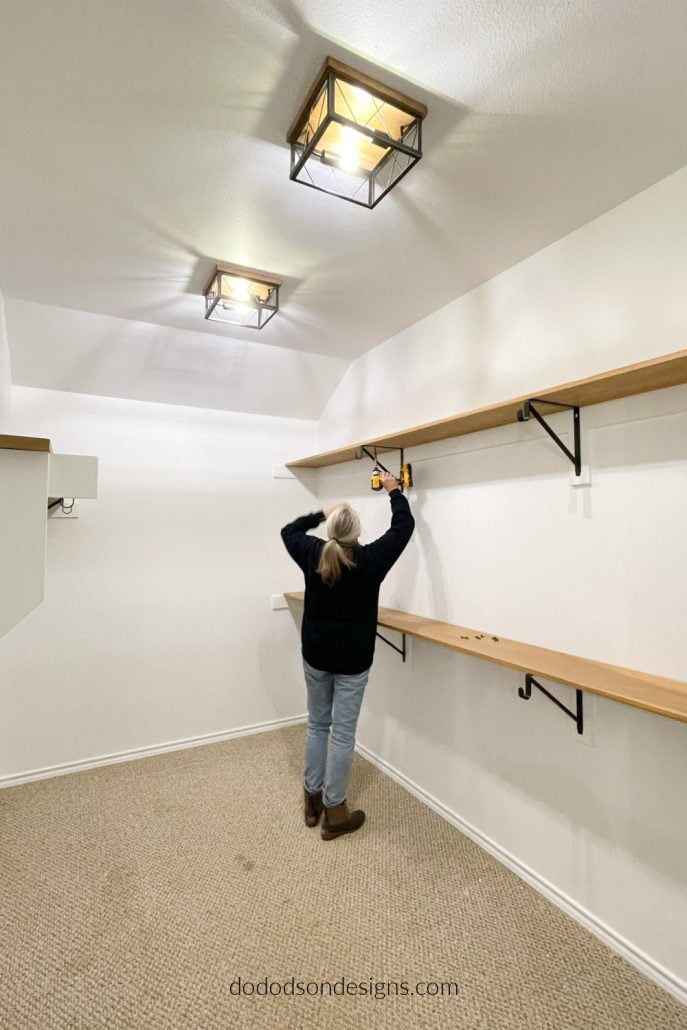
- farmhouse ceiling lights
DEMO DAY – DIY Closet Update
The first thing we did was tear out the old shelving and brackets in the closet. It’s not unusual to see a lot of MDF (a high-grade composite material made from recycled wood fibers and resin) used in a builder-grade home. It’s okay but lacks the character and warmth that only wood can give to a space. Even a closet!
We decided to leave the shelving supports on the walls in place. They were in good shape. No need to reinvent the wheel here.
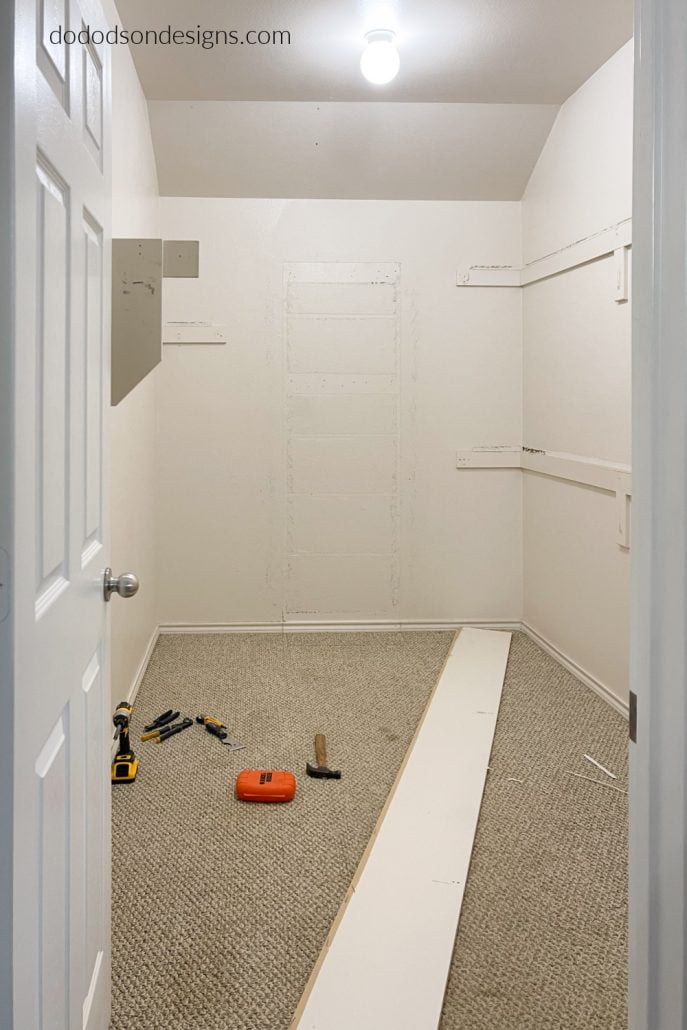
After the demo and some cleaning, the whole closet got a fresh coat of Sherwin Williams paint in High Reflective White. And those old-fashioned builder-grade BOOB LIGHTS have got to go! My hubby seriously almost choked when I called them “boob lights.” He learns so much from me. LOL
I’ve heard this before, and I agree that painting a closet white will help not only make it look bigger, but the aesthetic white background allows me to see the true colors of clothing when putting together an outfit for the day.
Replacing The Shelving – Closet Update
I saved the old MDF shelving that was removed as a template for the new wood shelves before being tossed to the curb.
VALUABLE TIP “Measure twice and cut once.” A valuable lesson I learned from my Dad and brother a long time ago when working with wood. Especially when lumber is at a premium price.
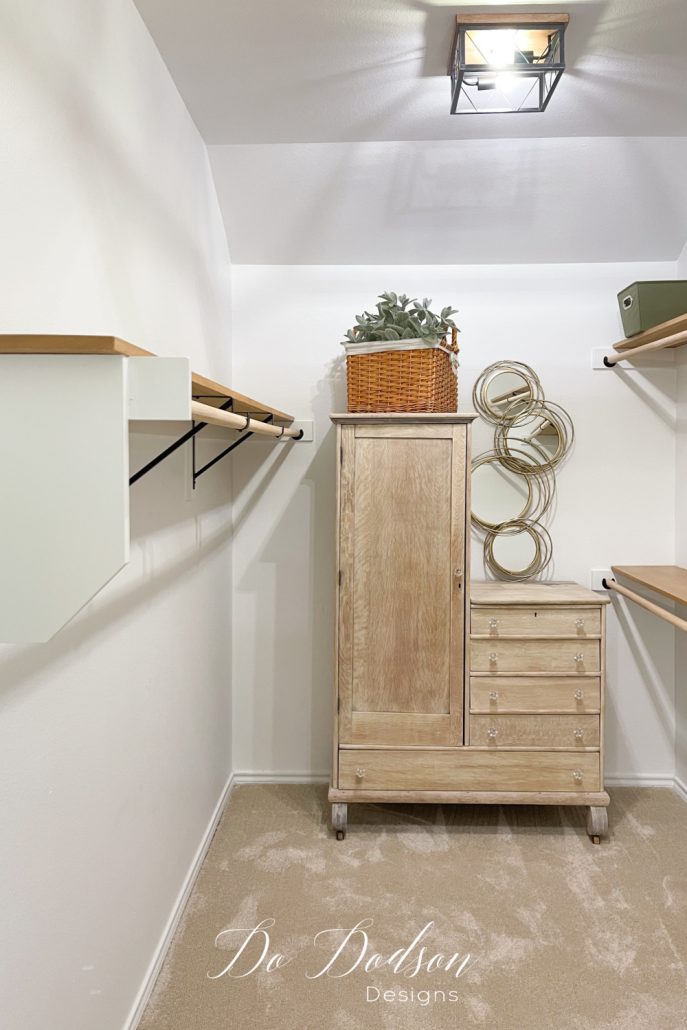
We also repurposed the wood closet rods with this closet update. Those rods will get an updated look to match the new wood shelving.
Why We Chose Poplar Wood For Our Closet Update
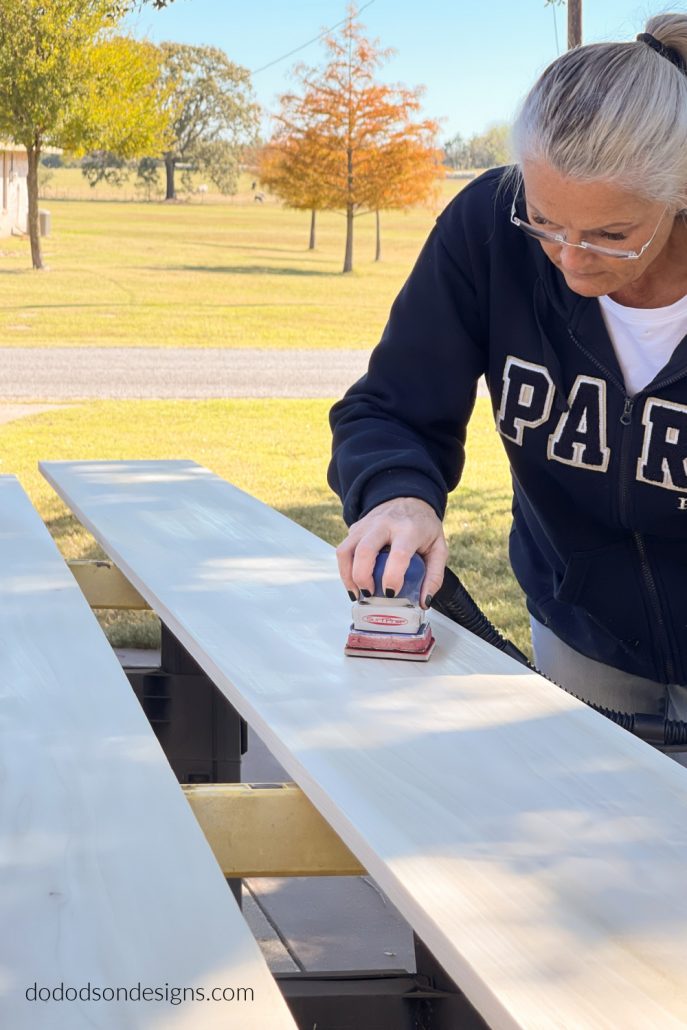
The old MDF shelving was replaced with 1X12 poplar wood. I’m not going to lie; it was a bit pricey but still less expensive than custom shelving which is not in the budget. That was my bargaining (argument) tool with my hubby.
Poplar wood is often used as a paint-grade wood, but I find that it stains beautifully. And it’s less expensive than oak.

To prepare the poplar wood for stain, I sanded the boards with my SurfPrep Sanding System using medium (220 grit) sandpaper.
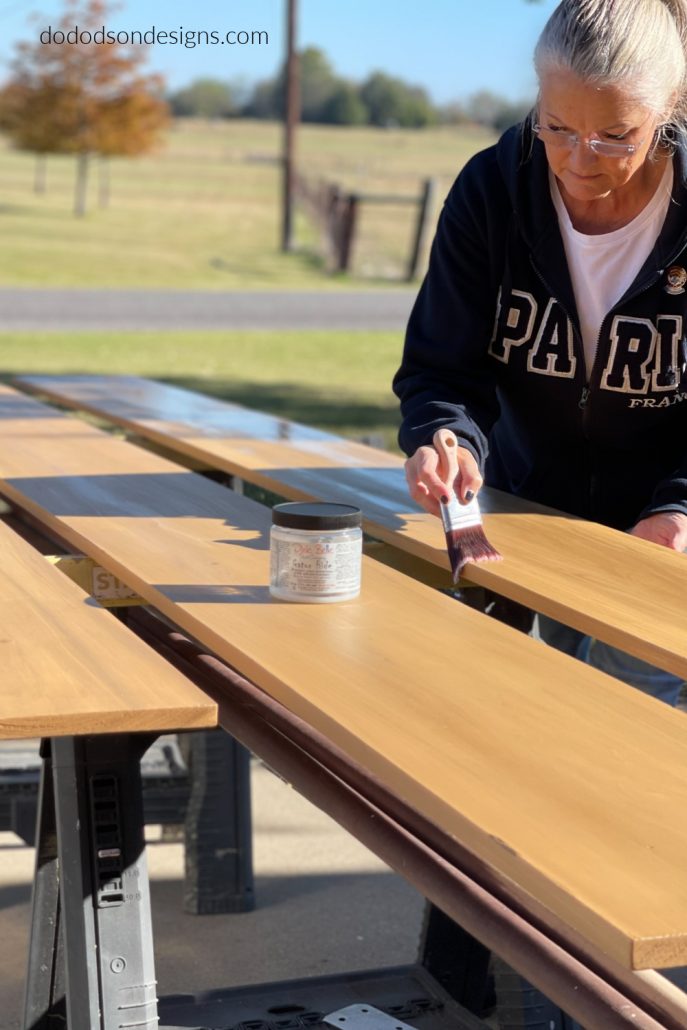
The boards were then stained (front and back) with Fruitwood – Old Master Gel Stain. It gives a light wood tone and goes perfectly with my modern farmhouse style. I like the color, and we have used it throughout our home, including the recent remodel of our laundry room. CLICK HERE to see how we used this color stain with a second color to give our cabinets a unique look.
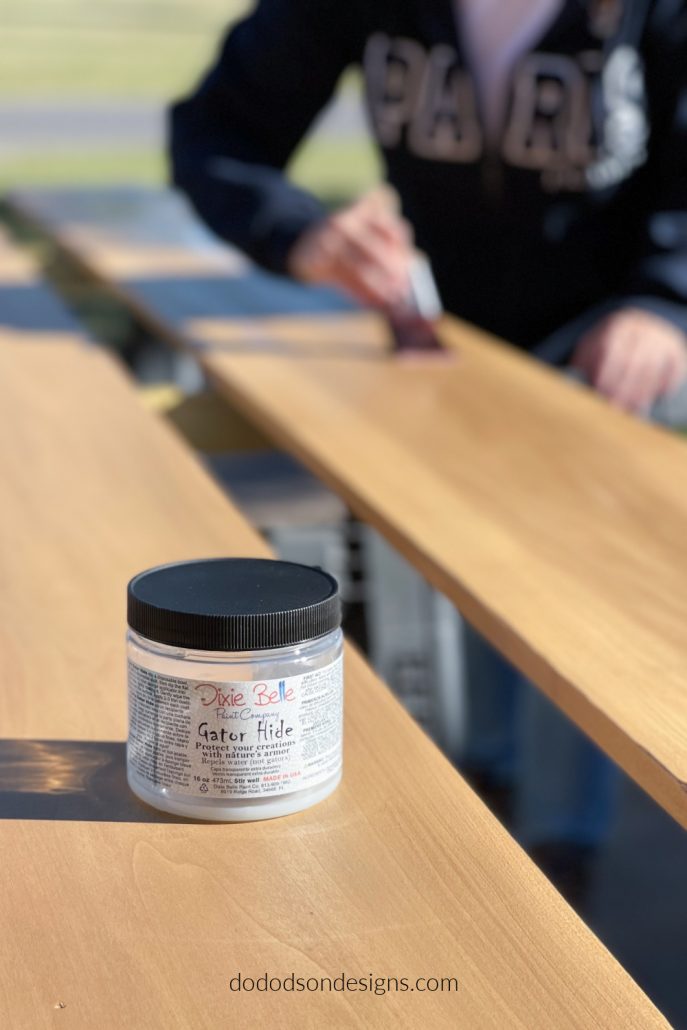
Can You Use A Topcoat Over Gel Stain?
It is perfectly okay to add Dixie Belle’s water-based topcoat called Gator Hide over the oil-based gel stains as long as you allow proper dry time. This topcoat is what I prefer to use on wood surfaces due to its durability. I use Gator Hide on all my wood DIY home projects.
It was a beautiful warmish sunny day here in Texas, and the gel stain dried super fast. I usually allow 24 hours to dry before applying topcoats, but being outside sped up the drying process and allowed us to finish our closet update the same day.
Two coats of Gator Hide were applied over the stained wood with a high-quality synthetic paintbrush. It’s a must when using topcoats. The finished product is only as good as the brush you apply it with. I learned that the hard way, so you don’t have to. You are welcome!
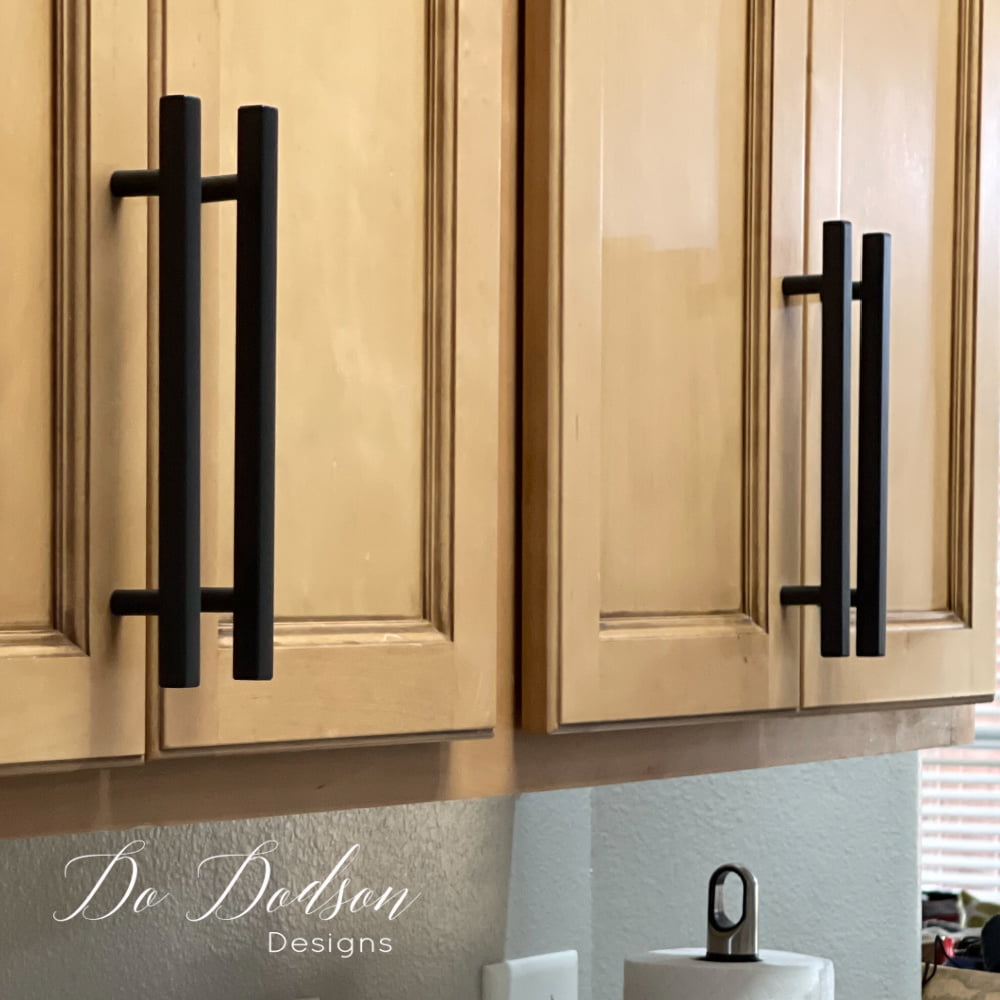
Update Old Hardware And Lighting
The new heavy-duty hardware was purchased from Amazon because, hello, you can get it overnight. We joke about the Amazon drivers because they know us on a first-name basis. 🙂
The installation was easy and required a cordless drill and a little elbow grease. Literally, in 30 minutes, we had the new brackets and shelving installed.
And I saved the best part for last. No more BOOB LIGHTS! I found these flush-mount farmhouse ceiling lights on Amazon as well.
The new lights match the wood shelving. I’m now totally in love fast with this closet update. If it were a bit larger, I would put a sofa in here to have my morning coffee on. Yep, I would.
Shortly after our closet update, I called our local flooring store for new carpet, which quickly spilled over to our bedroom. Does it ever stop? The bedroom makeover has begun!
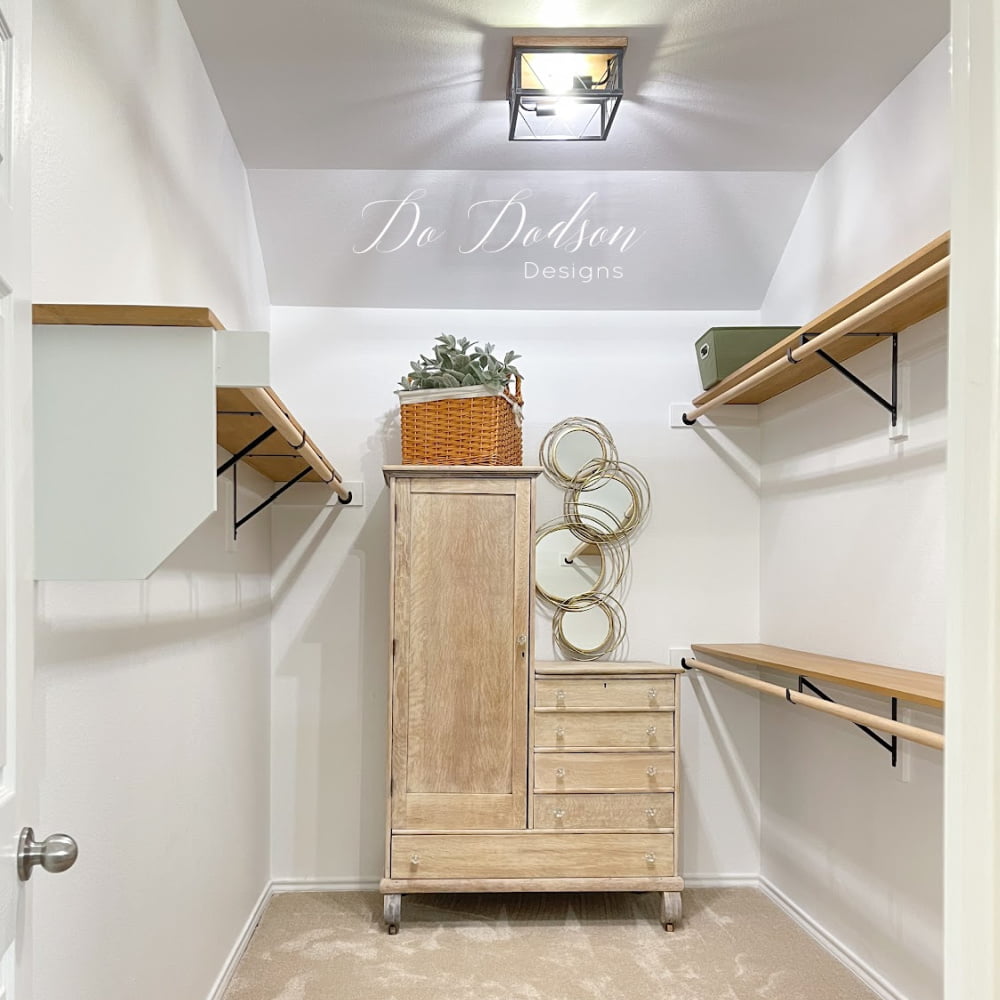
The Results Of Our One Day Master Bedroom Closet Update
It is a big closet and big enough to house one of my FAVORITE DIY projects. My Grandmother’s antique chifforobe has a new home, and I couldn’t be happier. The bleached wood finish on this antique ties this closet all together for me. A closet in a closet!
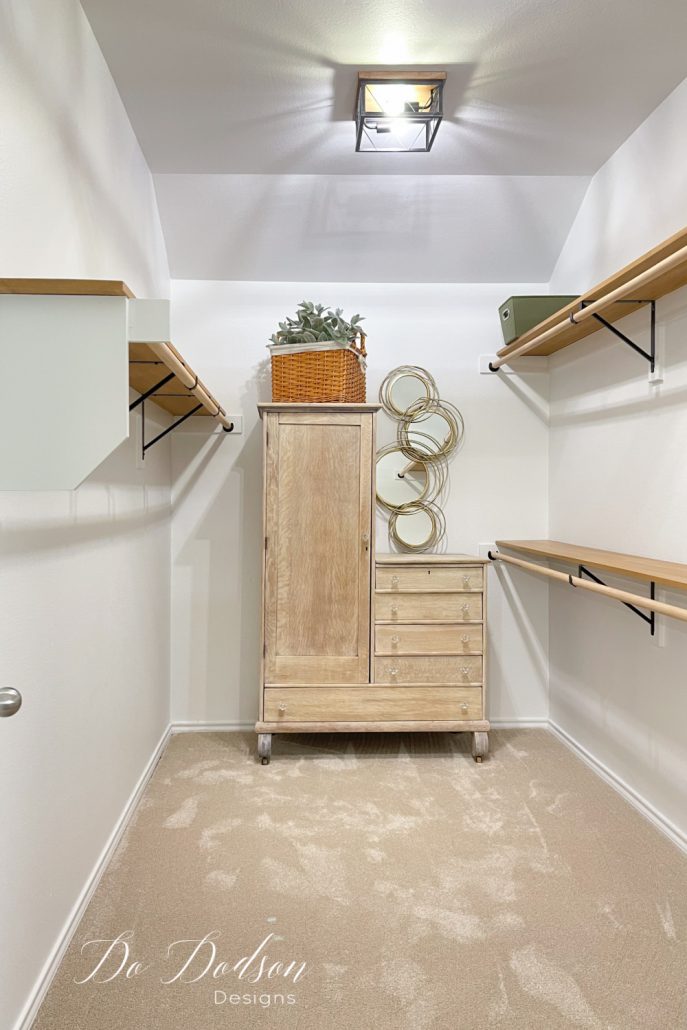
It seems wrong to me to add all those clothes back into this space. It’s so pretty empty!
And that’s the story of how we did our master bedroom closet update in one day. Our tongues were hanging out of our mouths by the end of the day, but it was worth every second to see it all completed.
Thanks for hanging out with us here today. We enjoy sharing our home and hope to inspire you to try more DIY projects in your home. You never know what you can accomplish until you try.
If you like this project, please share, comment (let me know you stopped by), and PIN this on your DIY Pinterest board for future reference.
We wish you blessings from our home to yours.
Until the next project. xo, Do
LOVELOVELOVE!!!! And I’m glad you included a photo of you in the closet as that shows us how big the space is. Oh, and I Covet your Grandmother’s chifforobe! Such a sweet and Precious piece that brings with it Precious memories and vibes.
LOVE your show!!!:)
Thank you, Janice! That chifforobe is special to me, and I’m so happy to have it. Thanks for stopping by. Blessings 🙂 xo
Great job and I love the piece you used in it. I am a bit smitten with the lighter wood tones these days, well done!
YES! The lighter wood is my jam, and I agree with your style. You are an incredible interior stylist. xo 🙂
Your closet looks beautiful, my friend!
Thank you, sweet friend!. xo 🙂
Love it! The colors are great the piece at the back is gorgeous you always do such a beautiful job.
Awe, thank you so much, Terri. I’m so happy you joined me today. 🙂 xo
I love closet updates. Besides the beautiful update I love your grandmother’s furniture and the cute mirror DIY. I didn’t see what you used but if it’s on your site, please direct me. Thanks for sharing.
Hi Sue! Thank you so much. I didn’t write a blog post on that mirror but I do have another that I think you might enjoy. Here ya go! 🙂 https://dododsondesigns.com/diy-antique-mirror/
Omgoodness what a closet Do! Having a cup of coffee in that space would be amazing – maybe a chair would fit instead of the sofa you mentioned?? It’s just gorgeous and so spacious! Pinned!
Thanks, Cindy. I’m pretty proud of it. I could do a small chair. Hmmmm 🙂
Beautiful, you did a wonderful make over. Love it
Thanks, Pat. I had been wanting to do it for a while now and I’m so glad we just dove in and got it done. 🙂
It is a very nice reDo for sure! I totally understand hating to replace everything and mess up the look, lol, but it’s a perfect time to remove things you know you should discard but just never quite get around to doing it😅😅 glad you included the picture of you inside, it’s MUCH larger than it looked empty.
Hi Sharon, Thank you so much. Yes! I did a total overhaul of everything, and it was amazing to see how much stuff I didn’t even use—especially clothes. I feel so light now!
Your new closet is gorgeous and your grandma’s cabinet is the icing on the cake! 💙🤗 XOXO
Thanks, Denise! I like icing. 🙂
Oh my goodness, this closet makeover is amazing. I love how you transformed this space. Wow!
Thank you, Tammy!
The new light looks amazing in the closet.
So much better than the BOOB lights! LOL
Love your closet and the antique piece looks awesome there! What an improvement…..
Hi Sandi, I don’t know why we neglect our closets. We are in them daily. I’m glad we did this. Thanks for stopping by. It’s always good to hear from you. Have a great weekend. 🙂 xo
Great use of a “closet” within a closet! I love those old pieces
Right?! Why not? Always good to hear from you, friend. Have a great weekend. xo 🙂
What a beautiful transformation! I think I could just move a chair in there and stay for a while! Happy Monday!
Hey Leslie! I thought the same thing. If it were a bit larger, I would have. Thanks for joining me. Have a great day. 🙂 xo
Love your new closet. You did a fabulous job and you have so much space! I love everything you do!!❤️
Thank you, Lori. I enjoy sharing with those that appreciate the effort. 🙂 xo
I love, love, love your closet! So much so that I made my husband come to the computer so that I could show him and told him that we could surely do the same thing with our closet. He wanted me to ask the size of your closet. I am so ready for a closet makeover. Thanks in advance.
Hi Kathy,
Thank you so much. I’m so sorry for the delayed response. We have since moved from that house but I believe it was 8ft x 12 ft. I do miss that closet. Best wishes on your closet makeover. It’s worth the effort. 🙂 xo
Love it my friend! Simply gorgeous. I’d like to start updating mine so this was a great reminder and inspiration! 💙😊 hugs. 🤗