
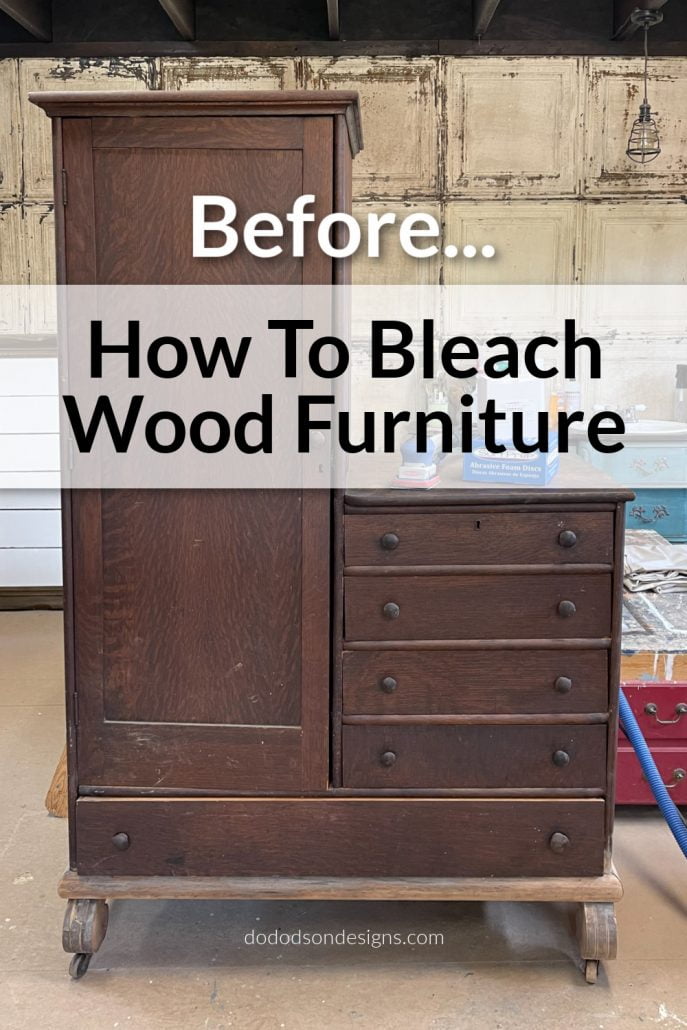
Have you ever wondered if you could lighten and brighter dark wood? Me too! So, I decided to do some research and came up with this solution. It’s my very first attempt to bleach wood furniture, and I killed it. Not literally, but this antique tiger oak chifferobe sure does look amazing now.
* As an Amazon Associate, I earn from qualifying purchases and through other companies as well. You are not charged extra to use any of the links, but any income I make helps me create more amazing DIY projects to share with you! To see my full disclaimer, click here!
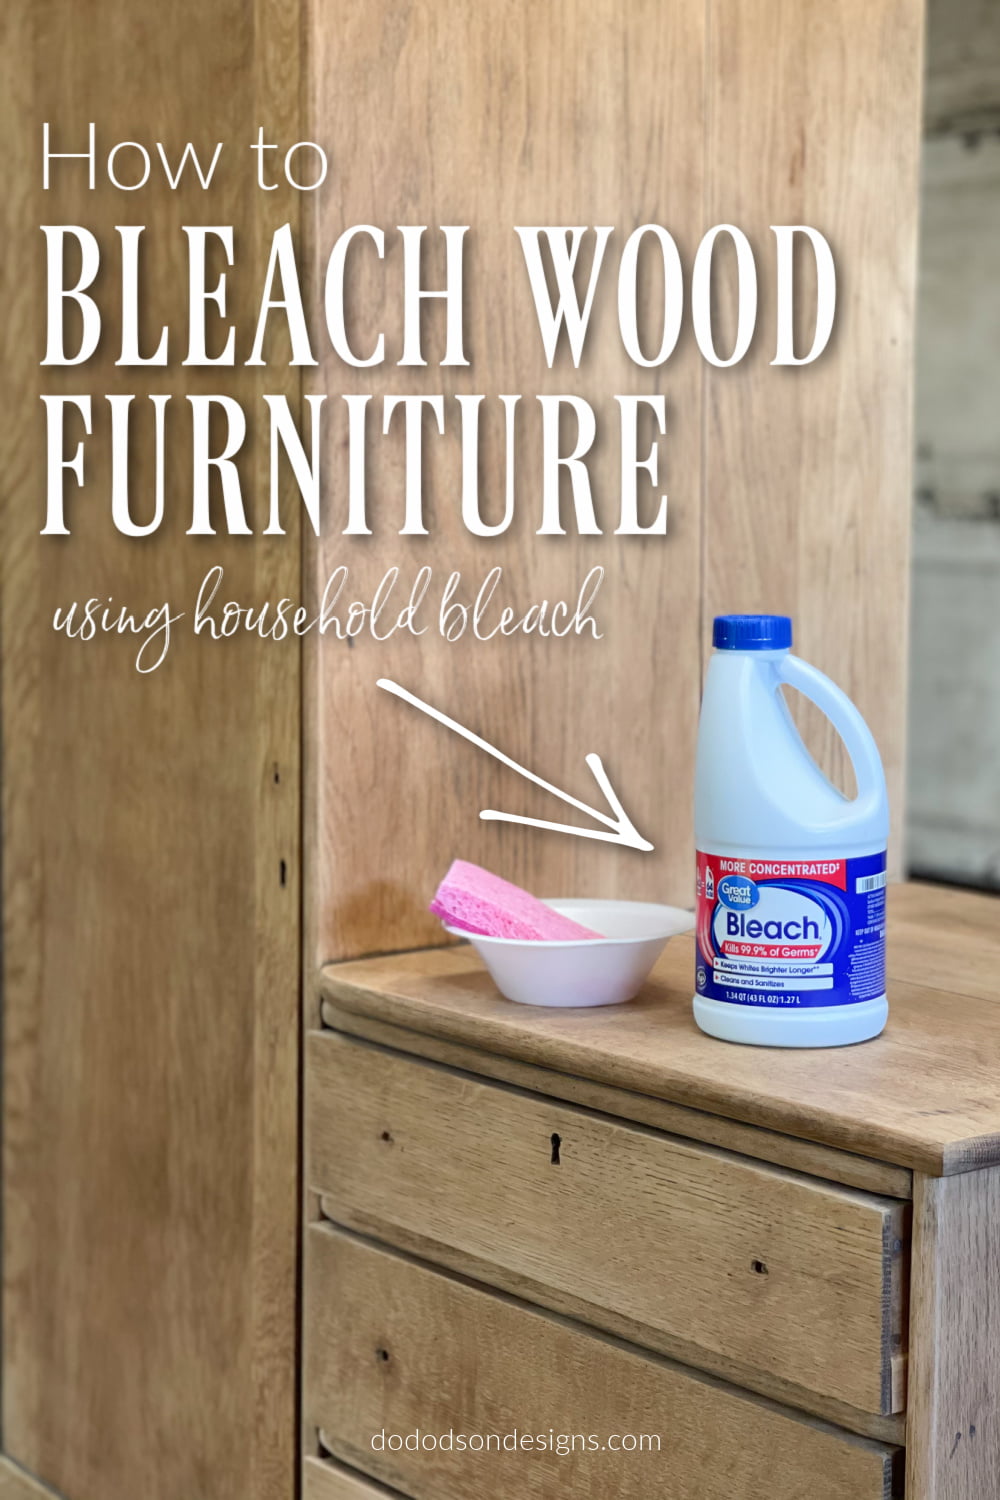
The Cheapest Way To Bleach Wood Furniture
While spending the summers with my Grandma on the farm, I fondly remember this one piece as a little girl. It was filled with linens, quilts, and all kinds of pretties but I don’t remember ever seeing clothes hung inside.
The wood grain on this antique was nothing like I had ever seen as a child and I’ll always remember using my fingers to trace the tiger like stripes. There was no way I could ever paint it, although it would be stunning.
I recently read a tutorial by a blogger friend who used household bleach to bleach wood and decided to give it a go. If she did it, I knew it would be okay to try this method. Thanks, Denise!

SUPPLY LIST:
- wood furniture
- electric sander (use my discount code DOIT10 to get a 10% off your purchase)
- or chemical stripper for wood
- household bleach
- sponges
- white distilled vinegar
- 220 grit sanding pad or sandpaper
- Best Dang Wax – White
- Wax Brush – Best Dang Brush
- clear glass knobs
Protective Equipement
- protective eyewear
- gloves
- Respirator or mask (always work in a well-ventilated area) outdoors preferred
* Work in a well-ventilated area when bleaching wood furniture, outdoors preferably.
Preparation Before For Bleaching Wood Furniture
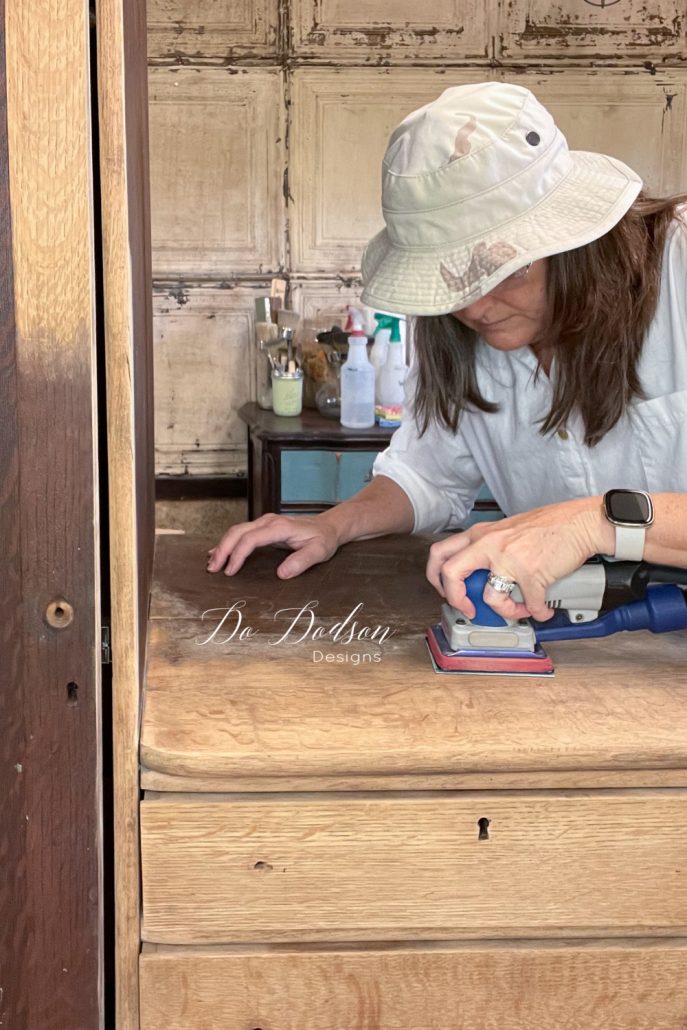
The finish on this antique was really dark. Not uncommon for a 100-year-old piece. The first step before you bleach wood is to remove the finish down to the bare wood. It’s the wood I wanted to bleach, so stripping it was easiest for me using my SurfPrep Sander. 👈 Click here to learn more about why I love this tool so much!
You can always choose to remove the existing finish by using a chemical stripper as well.
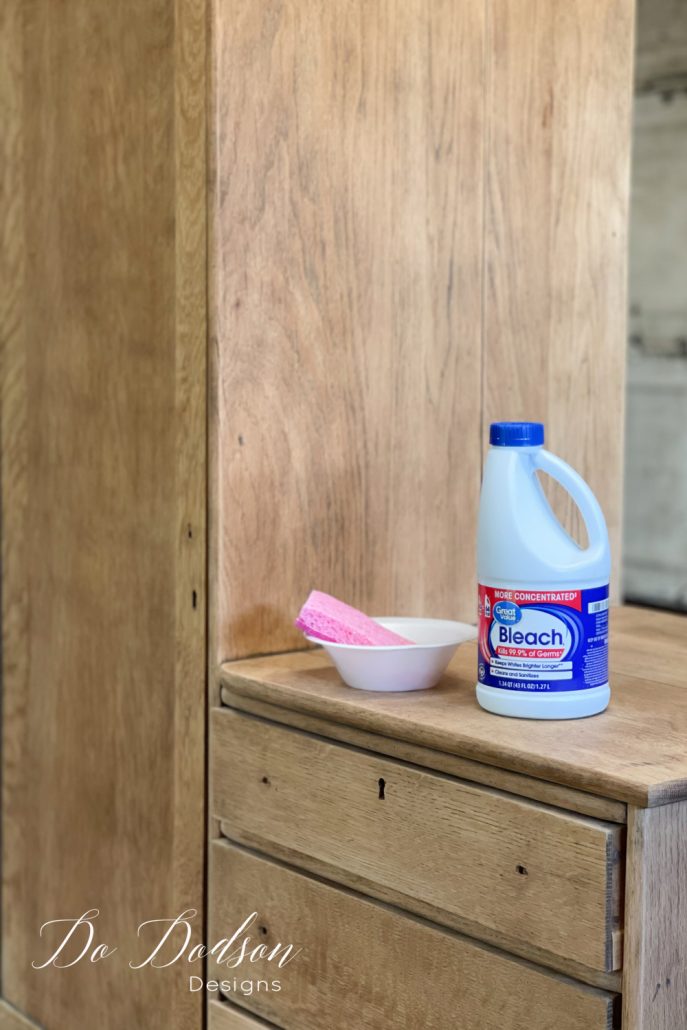
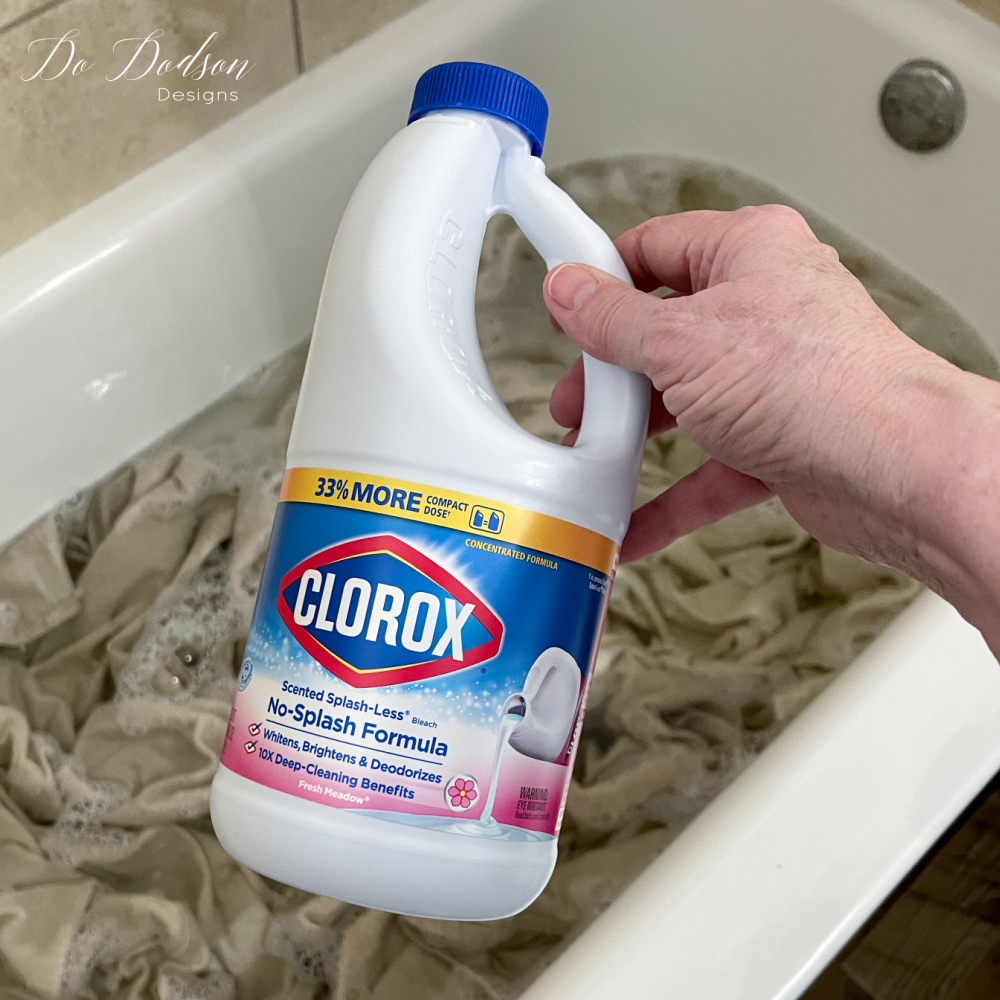
Believe it or not, you can bleach wood furniture with everyday common household bleach, and here’s how I did it.
STEP 1 How To Bleach Wood Furniture
Start with clean wood. After sanding or stripping, make sure the wood is as clean as possible. If you’re sanding off the existing finish, wipe clean with a water-damp cloth to remove any residual dust. There will be a lot of dust if you chose to use the method.
*Always work in a well-ventilated area. The fumes from the bleach can be hazardous to your health.
STEP 2 Applying The Bleach On Wood Furniture
Add the full-strength household bleach (I bought the cheap stuff) to a disposable Styrofoam bowl. Be sure to use your protective equipment to avoid splashing the bleach on skin, eyes, or clothing… unless you want the tie-dye look.
STEP 3 How To Apply Bleach To Wood
Carefully apply the bleach to the wood with a sponge, and be careful not to puddle the bleach as this can cause uneven bleaching. You’ll want to apply an even amount. The bleach will soak into the wood pretty quickly, so you’ll want to work quickly. Allow the bleach to dry overnight and observe the level of lightness obtained the next day.
*The wood will get dark after the bleach is applied but will lighten again after drying.
STEP 4 Repeat STEP 3 To Lighten Even More
More than likely, you’re going to need multiple bleach applications to get the desired effect on the wood. You can repeat this step as many times as you need. After the second application, I decided to move the Chifferobe out in the sun. I had heard that this helps the bleaching process, and it worked!
On the 3rd application, I applied the 3rd application of bleach and allowed it to dry. The drying time was so much quicker in the sun. DUH! I don’t know if it was the 3rd application or the combination of bleach and sun, but I highly suspect the sun had a huge part in the success. It makes sense! I’ll be trying this again for sure.
STEP 5 Neutralizing The Bleach
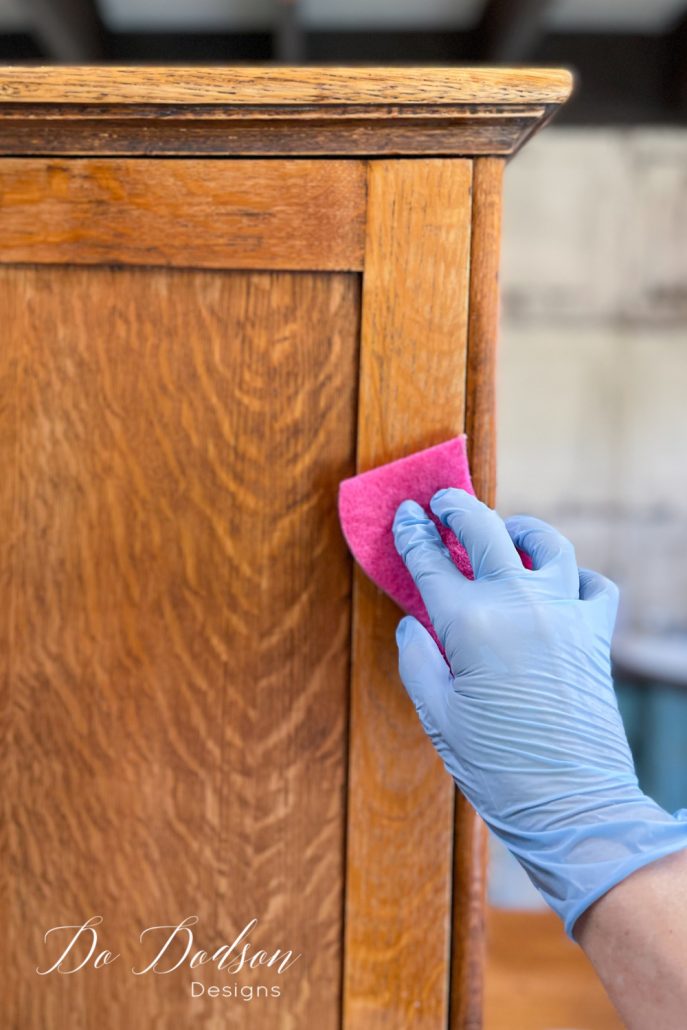
Once your wood has achieved the level of lightness you want, to stop the bleaching process, mix a 50/50 mixture of white distilled vinegar and water in a bowl and with a sponge, apply it to the wood, and allow it to dry.
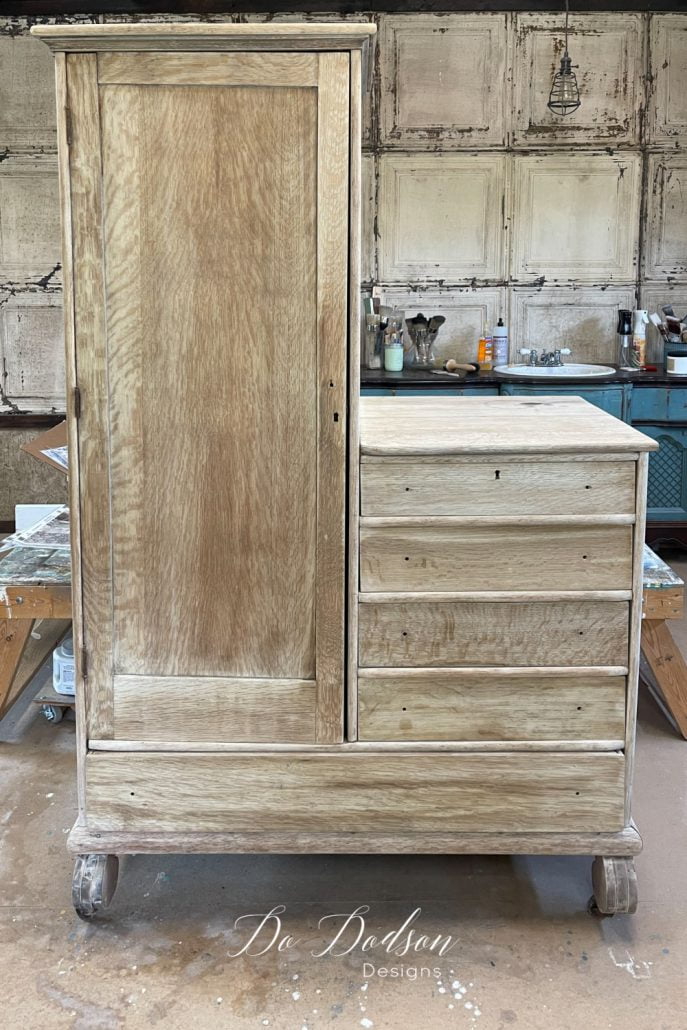
The Results After Bleaching Wood
Bleaching the wood allowed the wood grain to really show it itself off. Here’s how it looked after the 3rd application of bleach.
*NOTE… I noticed that the grain didn’t lighten as much, but overall it’s a great look on a grainy wood like the tiger oak.
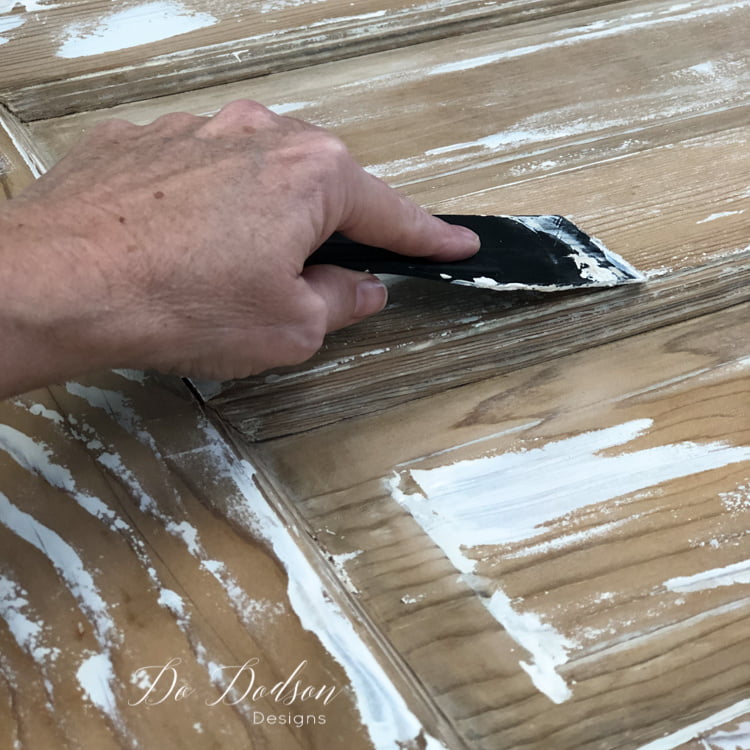
STEP 6 Smoothing The Wood Grain After Bleaching
After bleaching the wood, you will notice that the wood will be rough and the grain raised somewhat. That’s because the bleach has dried out the wood. To smooth the wood grain, use a 220 grit sanding pad or sandpaper and then remove the residual wood dust with a water damp cloth.
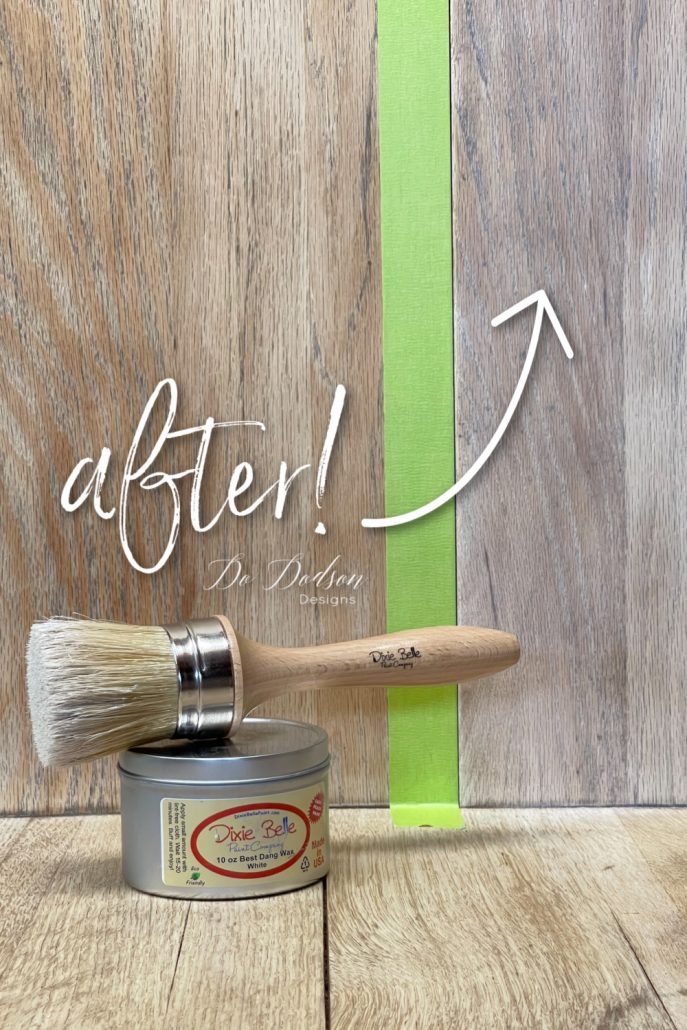
STEP 7 Sealing The Bleached Wood
Once you have achieved the perfect shade of your wood, the last thing you want to do is add a topcoat and darken the wood you just bleached. That would be a disaster!
Almost all topcoats will darken raw wood, and the best way I have found to keep the wood light and bright is to use a water-based WHITE WAX. Apply it with a wax brush all over the wood and buff to a beautiful finish with a soft cotton cloth. The wax will dry overnight and cure to a hard finish in about 30 days.
After it has fully cured, you can apply a durable water-based topcoat like Gator Hide if you desire, but I personally see no need for it unless you’re refinishing a tabletop that is going to have a lot of traffic and needs extra protection.
Here’s The Look You Get When You Bleach Wood Furniture
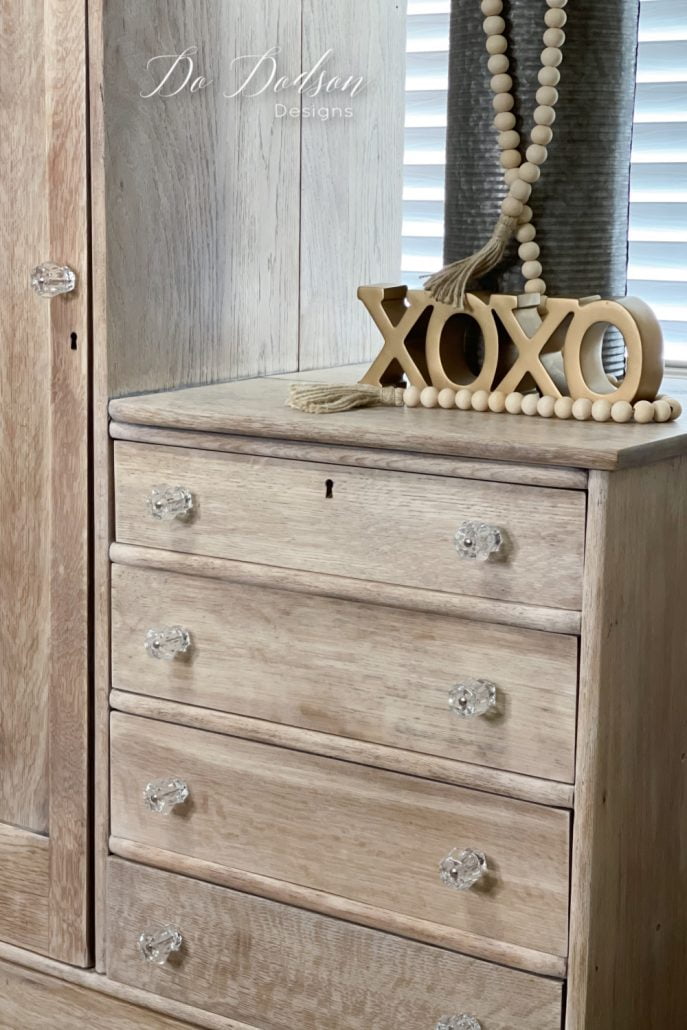
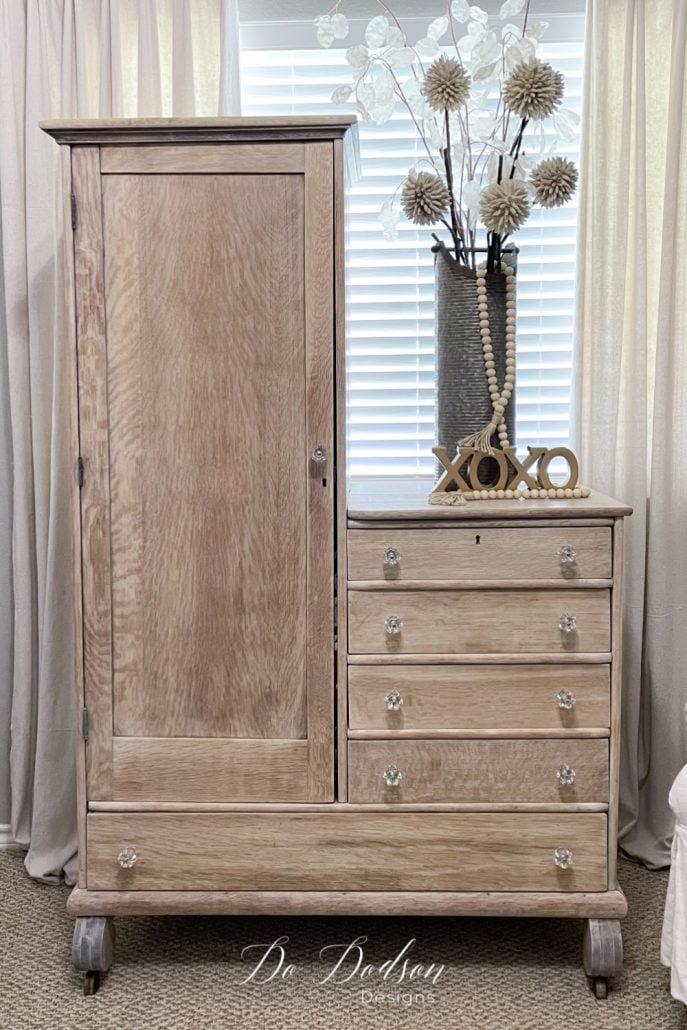
Hello, beautiful! Look at all that wood grain beauty. You can really see the tiger oak after bleaching the wood, and I’m so pleased with how it turned out. Even happier that it now lives in my office. 🙂
Thanks for joining me today, and I would love to hear what you think about this DIY bleach job. Have you tried it or have additional info to share? Please drop me a comment below. I always love hearing from you.
Until the next project… xo, Do

Looks absuluut lovely.
I just finished my table top.
I quite often use drainentstopper to take off some paint.These day s it is not the same stuff as I got about 20 years ago.
This one is better for the klima.
It comes off very easy and quickly using the water hose at the same time.rinse thearely and ofcourse you have to this outside.Then let the wind and sun do the rest.
Hi Veronika! I’ve never heard of this product. I know that the old strippers worked better than the one’s today. That’s why I’ve started sanding off the old finishes. 🙂 Thanks for sharing.
Absolutely stunning!! The wheels are turning for my next furniture find!😁
It’s so fun, Kim! Keep an eye out for an oak wood piece. I think this works best on the hardwoods. 🙂 xo
I love it! Beautifully inspirational ❤️
Thanks, Barbi! 🙂 xo
Hi Donna!! I love bleached wood. So pretty.
Thank you, Cheryl! So good to hear from you. 🙂 xo
That’s a piece of furniture to be proud of! Your grandmother would be so proud.
Thank you, Dorothy! I think she would love it too. 🙂 xo
I have tried bleaching wood, it made it very dry, I wasn’t happy with the results & ended up painting the nesting tables. It was a cherry wood & took several coats of bleach, I would do it again but with a different type of wood. Thanks for sharing, it is beautiful!
Thanks, Janell.
Thanks. Yes, it does dry out the wood. I think the hardwoods are the best option. 🙂 Thanks for sharing your experience. xo
As much as I love love love what you did with this piece I do have a question. My pieces to my bedroom set were purchased in the 90’s. It was an expensive set when purchased and has that veneer look stuff on the tops of the pieces. What do you think…do you think the veneer would take the bleach?
Thanks…Shirley
Hi Shirley,
That’s a great question, and after careful consideration, I don’t think this would be good for the veneer. The bleach could seep under the veneer and break loose the venner. This technique is best used on solid wood. Bummer 🙁
Hi Shirley, i’ve bleached wood veneer pieces and they turn out beautifully. i’ve used both household bleach and a 2 part A & B bleach and it works well. just be sure to not overly saturate the piece and be patient or the veneer may being lifting, all depends on the furniture’s condition but its very possible.
Thank you for sharing with us all. The creative community is the best. 🙂
What an absolutely stunning result. I have beeb looking for some inspiration and this is it. Will start looking for a piece to bleach asap. Thank you.
You are welcome, Rosemary! 🙂
Your piece turned out beautiful! Love it!
Will this method work on knotty pine?
I want to redo my kitchen cabinets, they are knotty pine from 1950, I refinished them 25 years ago. I’m ready for a new look in the kitchen.
Thank you
Oh my goodness, Kathleen! That would look amazing! Here’s what I would do. I would test a door first… or a piece of knotty pine similar to your cabinets. The bleach is super smelly, which worries me a bit to think about you doing this inside your home. I personally think the pine would lighten, but it might take several applications. If you chose to do this, remove the doors and do it outdoors. And let me know if you decide to try it. I would love to see your results. 🙂
Do, would clear wax work as well as the white? I am thinking of doing raw wood legs and want them to really look raw. Thanks for sharing! Your tutorials are always right to the point and easy to follow.
Hi Gail,
Even the clear wax I find can darken the wood some. It also tends to bring out the wood colors: yellows, pinks, and so on. That is why I opted to use white wax on this project. I’m happy you are enjoying the tutorials. 🙂 xo
You found such a gorgeous-perfect piece to do this bleached wood finish on Do! It looks amazing my friend.😍 And thanks for the shout-out btw… super sweet! 🤗 XOXO
You’re welcome, my talented friend. 🙂 xo
Hello! Just jumped over from your YouTube page. Picked up a “42 round oak dining table. Quick fix to give to young daughter…woah, I’ve made a mess! Trying to decide whether to strip or sand…bubbles galore! I digress…would you think this process would work on solid kitchen cabinets? Think oak, 30 year old…
That sometimes happens when you’re refinishing wood. If the bubbles are tiny, you can try to lightly sand and reapply the topcoat. As far as the bleaching technique, I don’t see why not as long as you seal the wood after bleaching. Wishing you much success with your furniture makeovers. 🙂
I am obsessed with the look of this piece. Once again, Do, you knocked it out of the park. I’m going to look around for a small pice to try at some point. Thanks for sharing your talent!
Fantastic GIGI! I would if you would share the results with me. Good luck with your project. 🙂 xo
When I saw this on Instagram, I had to head over to your blog to see how you did This! You are so creative! I have never heard of this method and love the outcome. By the way, your photography is A+!
Awe, you’re so kind. I do love photography. As for the bleached wood, it’s not a new technique. I learned it from someone else. 😉 But I really love the outcome. xo
Love the results! You gave that piece a beautiful update! As always, thank you for the excellent step by step how to’s. Can’t wait to try this on something!
Thank you, Gail! It always puts a smile on my face when I hear that sharing what I love helps someone else. I appreciate you. Have a fantastic weekend. 🙂 x0
During Covid, I started wiping down my dark antique oak tables with chlorax wipes and they took off the dark color on tops. So I wondered why you Need to strip at all? Why can’t bleach alone take off old finish?
Hi Michaela. I would not recommend using bleach to remove finishes, especially very old ones with a heavy varnish. Maybe your piece had a thin finish or had worn away from time.
This is absolutely beautiful! I have a question- and it may be silly – but, does the piece stink? Bleach has such a strong odor… and as much as I love the look, I’d hate to be left with a bleach smelling vanity in my bathroom 😂
Thanks for the inspiration!
Sarah
Hi Sarah! Not a silly question at all. Yes, the piece will smell like a swimming pool for a day or so, but the bleach smell will go away, just like when you use it in your home. 🙂 And it will be germ-free. LOL
This is such a cool technique. I would love to do something like this on our kitchen table here in Draper, UT. We are doing a mini kitchen makeover this month with some professional cabinet refinishing, and fixing up our table like this would be the perfect finishing touch for the space. Thanks so much for sharing!!
Thanks, Jackie! I’m so glad that you enjoyed this project. Best wishes on your kitchen makeover. So fun! We are currently working on ours too. 🙂 xo
What a beautiful piece of furniture, and what a beautiful finish! I’m certain your grandma would be proud. I have a question maybe you could help with. Everything I’ve read has said that wax is the very last thing to go on wood, but I notice you put a top coat on after your wax. How and when can you do this?
Hi Helen,
The wax I use is Dixie Belle’s Best Dang Wax. After the application and a long cure time (30 days is best), you can apply a water-based topcoat. But not all waxes work like this. I don’t recommend other brands with this technique. Here is what I use. affiliate https://dixiebellepaint.com/best-dang-wax/?aff=80
I hope this clears things up.
Correct me if I’m wrong, but I thought bleach and vinegar created toxic chlorine gas?
Hi Kerri,
I think you may be referring to bleach and ammonia. The bleach on the wood is dried by the time the vinegar solution is applied. I have never had an issue with it but thanks for asking. You can never be too safe. xo 🙂
During Covid I was wiping down my dark antique oak end tables with Chlorax wipes which striped the finish off. So do we really need to stripe old finish off?I think the Chlorax alone will strip it?2hat do you think?
Hello Michaela,
I have never tried this method but I don’t see this as a viable way to strip all furniture. Maybe the finish that was on your end tables was brittle and dry and in poor condition. I say as long as it works, go for it.
So the white wax did not turn the grain white, right? How many coats of the wax did you use? I’m worried about the grain all turning white, and I don’t want that. I wonder if other waxes would. It’s hard to find Dixie Belle products in Canada.
Hi Cindy,
The white wax doesn’t give full coverage like paint would. If your wood is grainy, it will settle in the low areas for a beautiful look. I will lighten the wood slightly. I would recommend testing other waxes on a piece of wood before applying. It should be fine. Good luck with your project and let me know how it turns out. 🙂 xo
Just an FYI. There’s no need to do a vinegar/water rinse bc chemically, there is no such thing as neutralizing bleach. This is spreading thru the furniture community bc the 2 step wood bleaching kit requires this rinse, but it’s due to 2 different chemicals creating a salt. Bleach begins to evaporate as soon as it begins to soak into the wood, which is why you need multiple applications. It’s actually toxic to use vinegar on top of bleach if still wet. Bleach plus vinegar will release chloride which will burn the airways. I hope that you will share the science to the painting community so the potentially dangerous mix of bleach and vinegar stops.
Hi Gina!
You are 100% correct, and I don’t know why I didn’t pick up on this sooner. I’m a retired nurse, and I know that bleach on a surface will only be active for so long before it neutralizes itself. Thank you for reminding me. I will definitely update this post.
Thanks again for looking out for this community. 🙂 xo
Thank you for letting me know, Gina. I have allergies, so I def don’t want to inhale anything toxic on top of that! 🙂
Wow, 30 days seems like a long time. I’m in the resell biz, and that seems like forever. Your thoughts on this? Thx! 🙂
Hi Stephanie,
Let me clarify this. When I say 30 days for a full cure time, it doesn’t mean it’s not dry. With most products, you have a cure time. The product will dry but isn’t at its max capacity for durability. When I was selling furniture, I would print out a statement to inform the buyer to use the furniture lightly. For example, nothing on top of the dresser over 5lbs pounds and to protect the surface with a cloth. Most customers appreciate this and understand that you can’t paint anything and use it the next day. I hope this helps. 🙂
This is super helpful! I recently refurbished a bookshelf headboard with gel stain and feel like the headboard needs a complementing piece. I decided to create a picture frame to hang above the headboard. The frame is made out of wood from pallets and I want to bleach it so it’s a lighter color. Your piece came out great! Thanks for the tips!
https://katietshome.com/creative-diy-headboard-makeover-idea/
Hi Katie!
Thanks for reading. Your headboard turned out fantastic! I would have never recognized it after the makeover.
Have fun with the bleach technique.
🙂 xo
It looks absolutely beautiful. You really did an amazing job on this piece.
Thank you so much, Denise. 🙂 😘