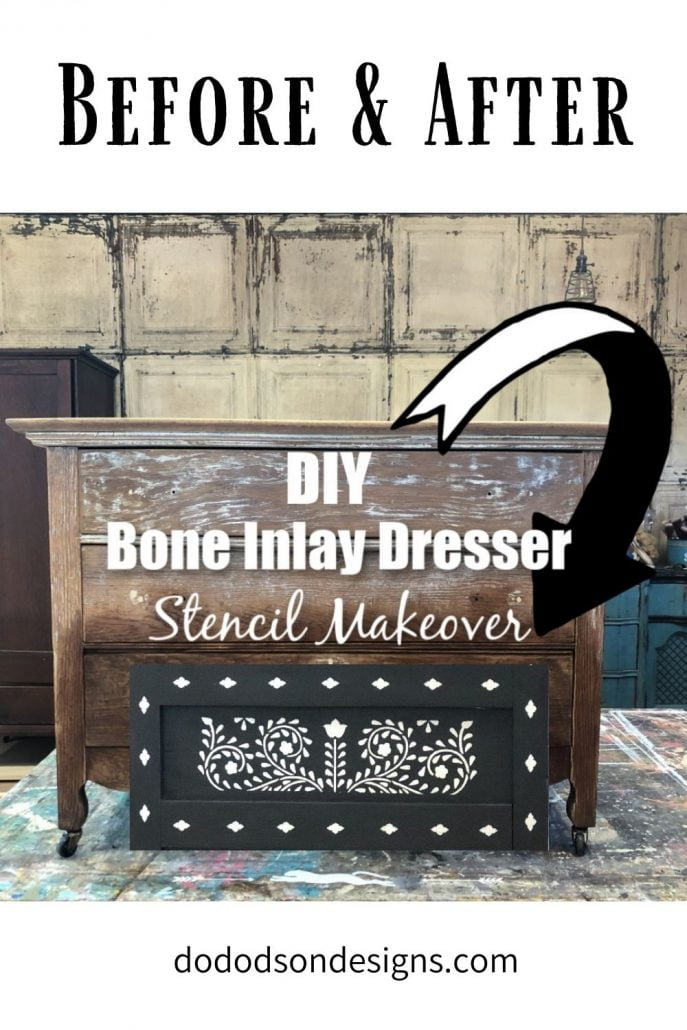
I have been drooling over a bone inlay dresser for a while now, but with the prices of these magnificent pieces starting around $500 upward to $2000… I had to find another route. These chic and classy pieces are definitely works of art as bone fragments were hand-carved to create these designs. Recreating this look is going to be a challenge, but you know I’m up for it! 🙂 So that you know… no harvesting of bones is involved in this makeover. That’s just rather creepy to me. Instead, I’ll use a stencil.
This post contains a few affiliate links to help you find the products I use. You are not charged extra to use any of the links, but any income I make will be used for more amazing DIY projects to share with you! To see my full disclaimer, click here!
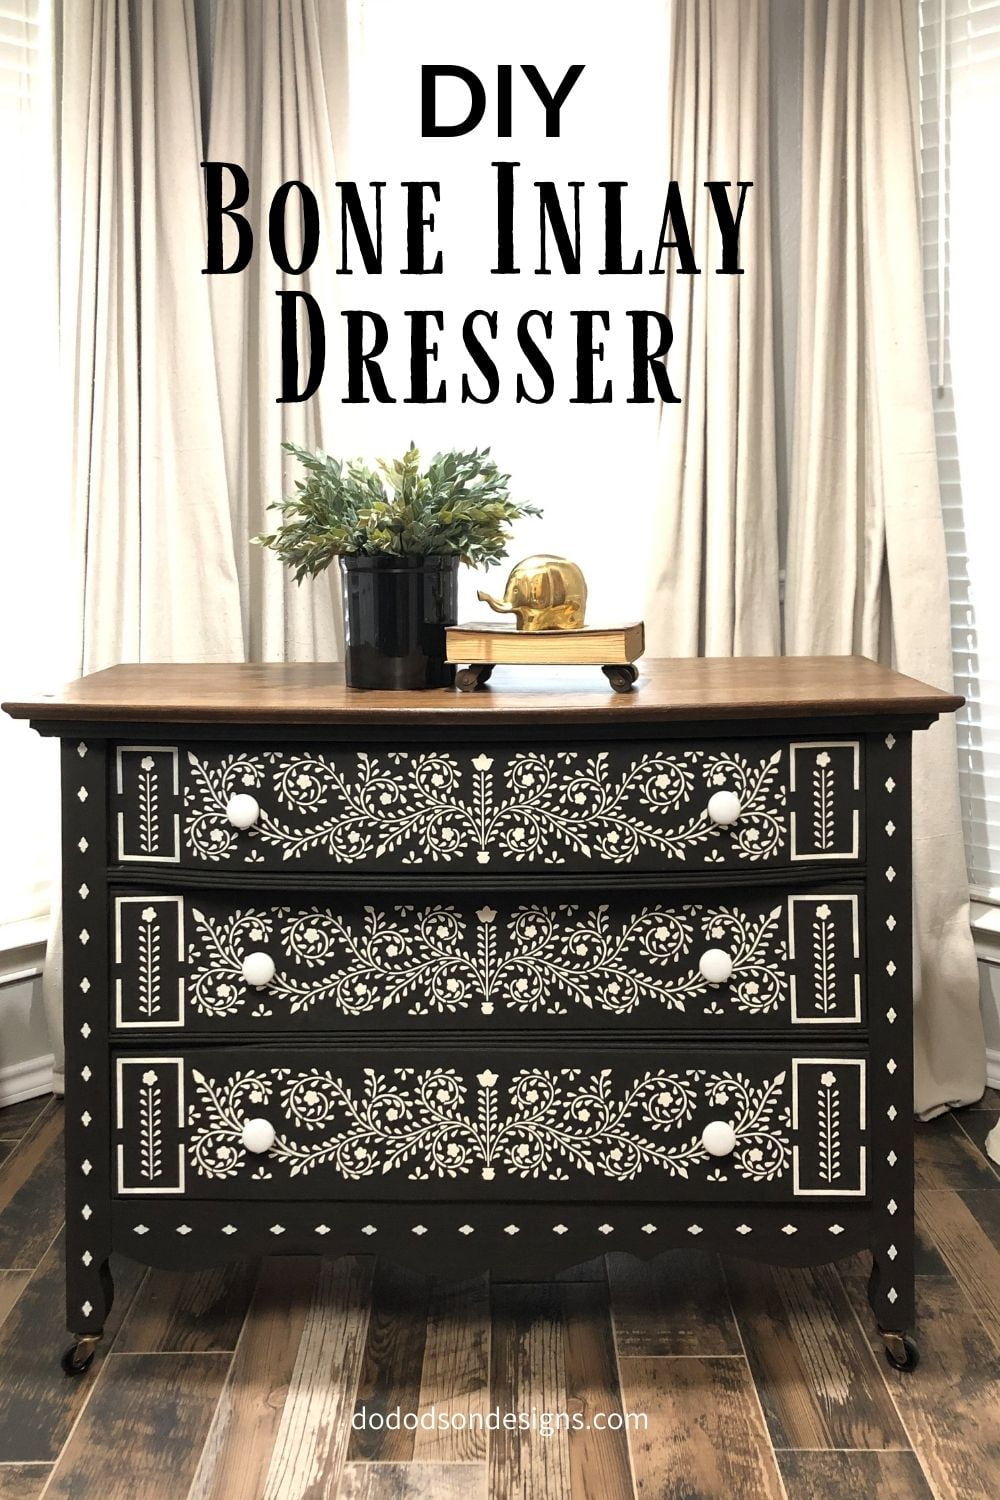
DIY Faux Bone Inlay Dresser With Stencils
Before we get started… a few things, you need to know. If you’re planning on a stencil project, make sure you give yourself ample time. A successful stencil project will not only take time but patience as well. Details are everything with bone inlay stencils and especially with this intricate Raja Bone Inlay Furniture Kit by The Cutting edge. Also, you will need to choose a wood dresser or side table that is free of any raised details. Basic flat surfaces work best for stenciling.

Product List For This Project
Click the products below to find where to purchase them for your Bone Inlay Dresser project.
- simple wood dresser (no details)
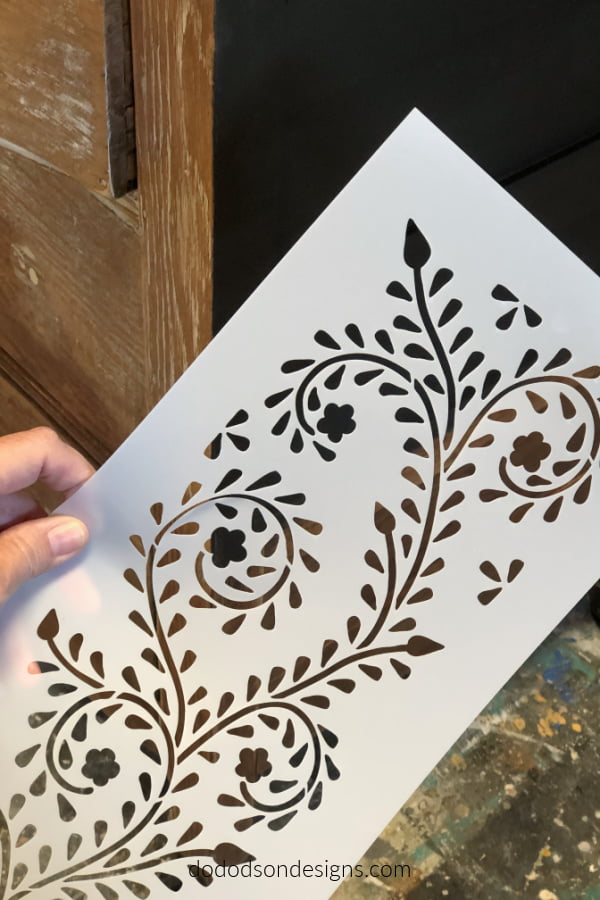
- Raja Bone Inlay Stencil (reusable stencil)
- Coffee Bean (chalk mineral paint)
- Butter Cream (chalk MIneral paint)
- Paintbrush (for base color)
- Stencil Brush (for stenciling)
- Baby Wipes (for cleaning stencils) Dollar Store $1
- Gentle Release Tape
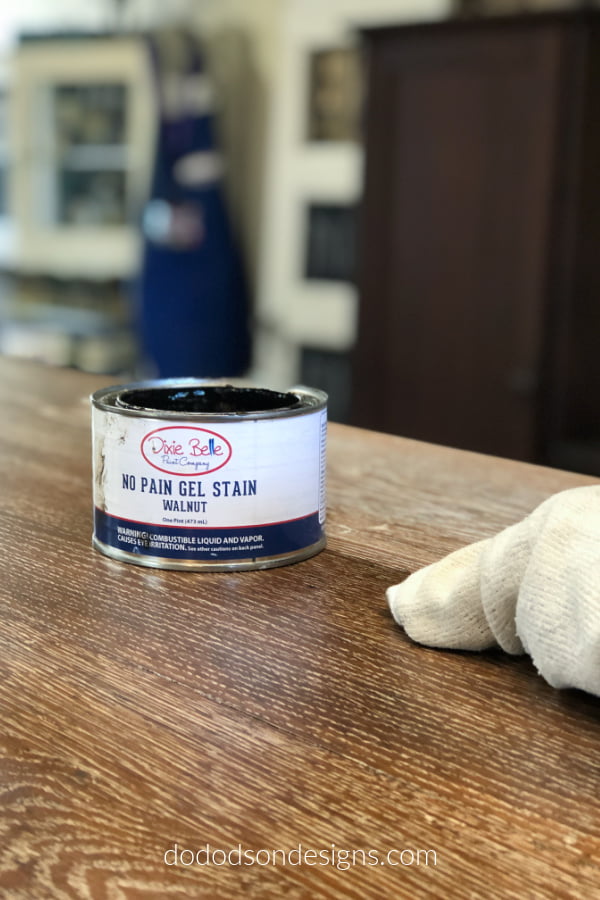
- No Pain Gel Stain (walnut)
- Applicator Pad (for applying gel stain)
- Gator Hide (waterproof topcoat)
- Ceramic Hardware
- antique caster wheels
Choosing Your Stencil Design
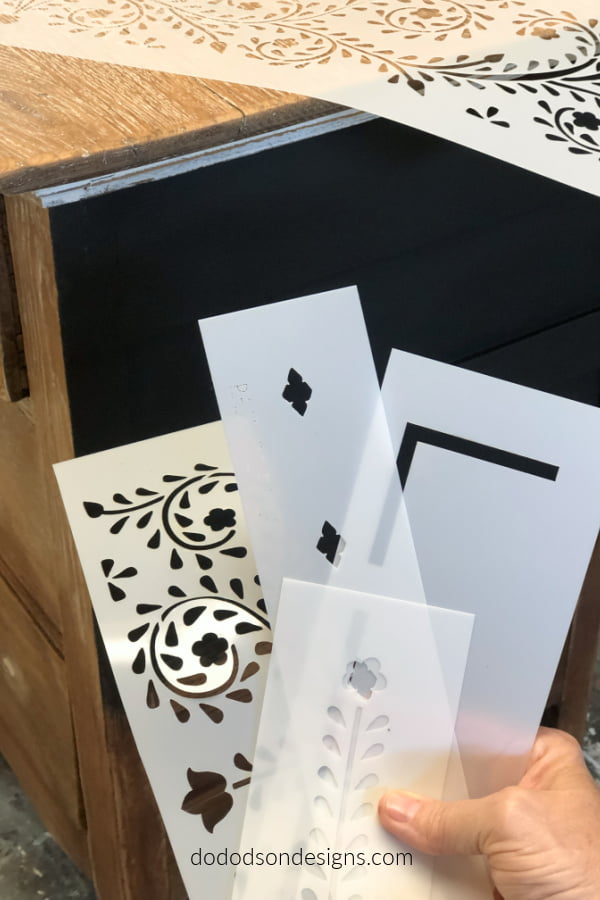
This bone inlay dresser stencil kit came in 5 pieces, and I had a choice of small or large. I chose the large one based on the dimensions of the stencil and dresser. The stencil kit wasn’t a perfect fit on the dresser drawers, and I’m pretty sure that is why they come in a set of 5. This allows the user to be creative with the designs. Nothing is cookie-cutter about this stencil.
Stenciling The Bone Inlay Dresser
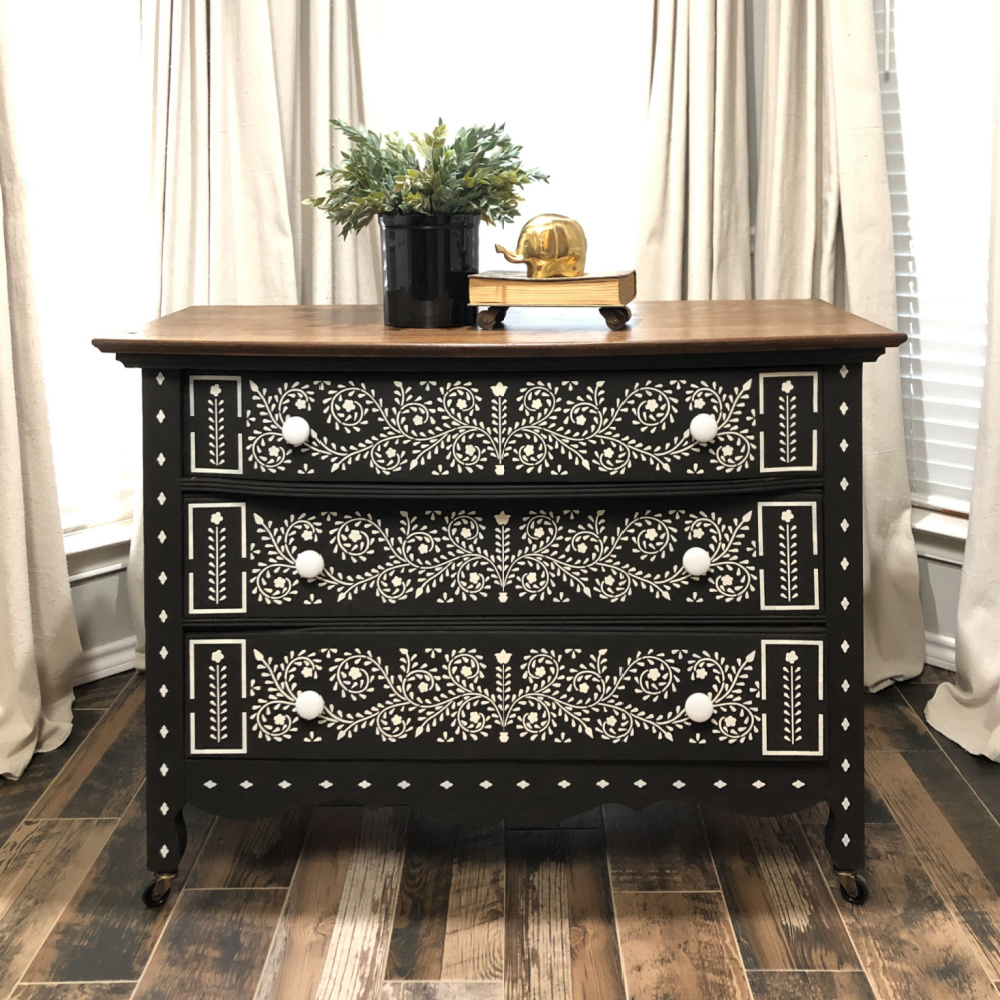
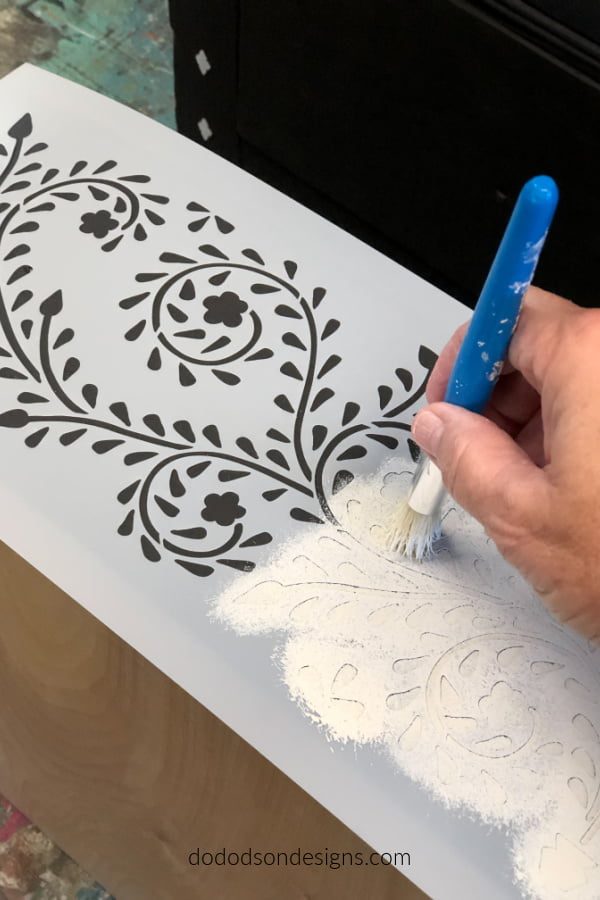
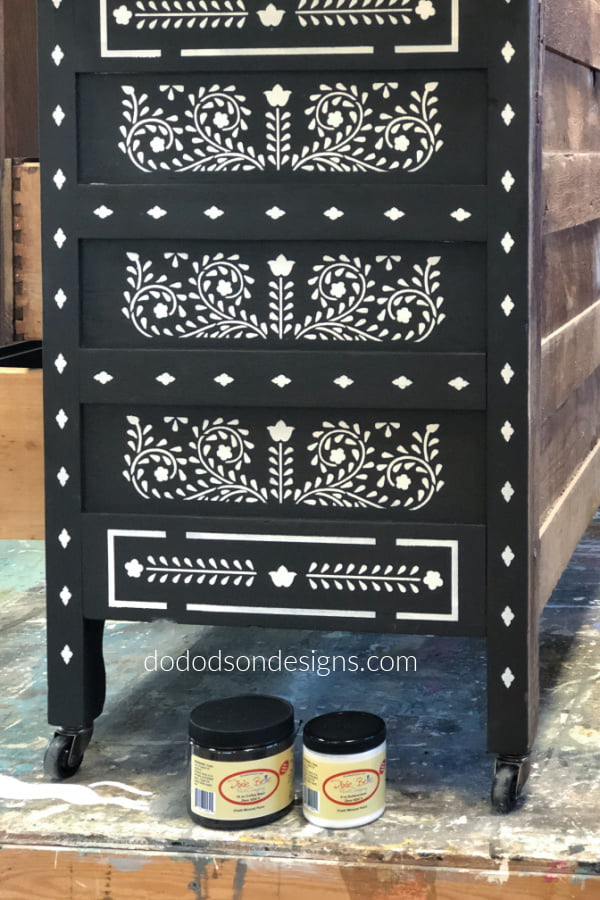
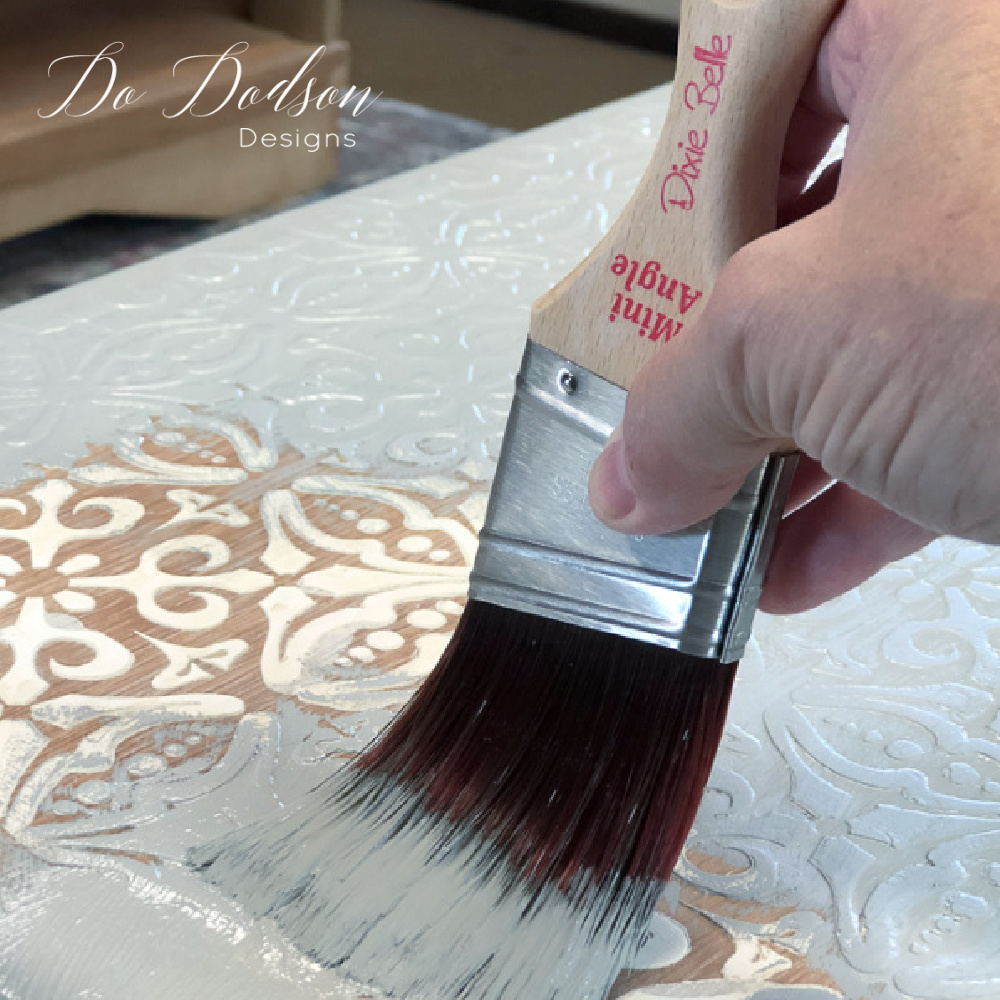
Start by painting the base of the dresser in a color of your choice. The color I’m using today is Coffee Bean by Dixie Belle. One of the reasons I chose this paint is because it has a matte finish and does not require a sealer. The instructions on the stencil package suggest that stenciling works best on a matte paint finish. I painted 2 coats of the chalk mineral over the base of the dresser and allowed it to dry overnight. 24 hours is recommended before stenciling the Bone Inlay on the dresser.
The Stencil Brush
For this bone inlay dresser stencil project, I opted to use a stencil brush. I have used rollers and sponges in the past on smaller projects with less detail which worked great. But because of the intricate pattern, I feel like I have more control over the paint using a stencil brush.
Customizing The Bone Inlay Stencil
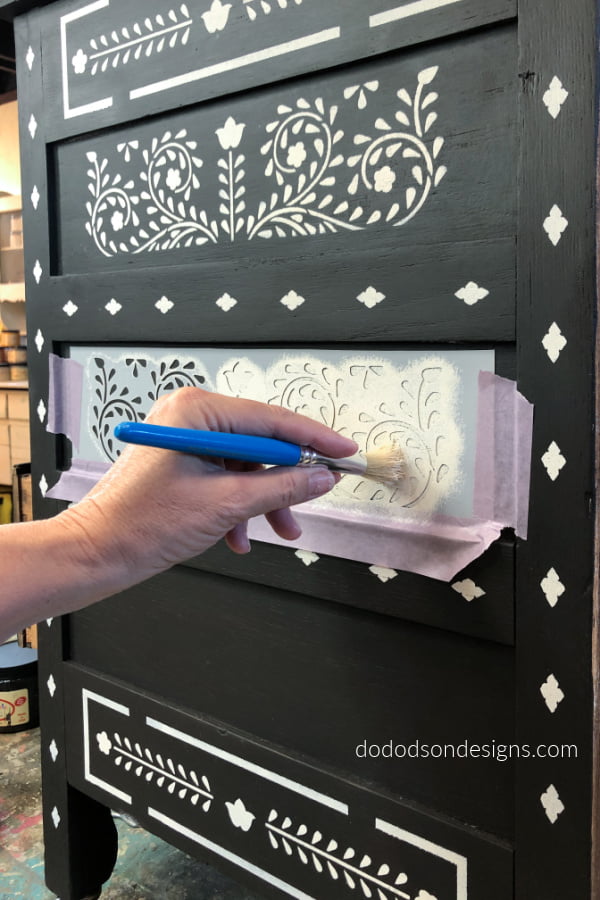
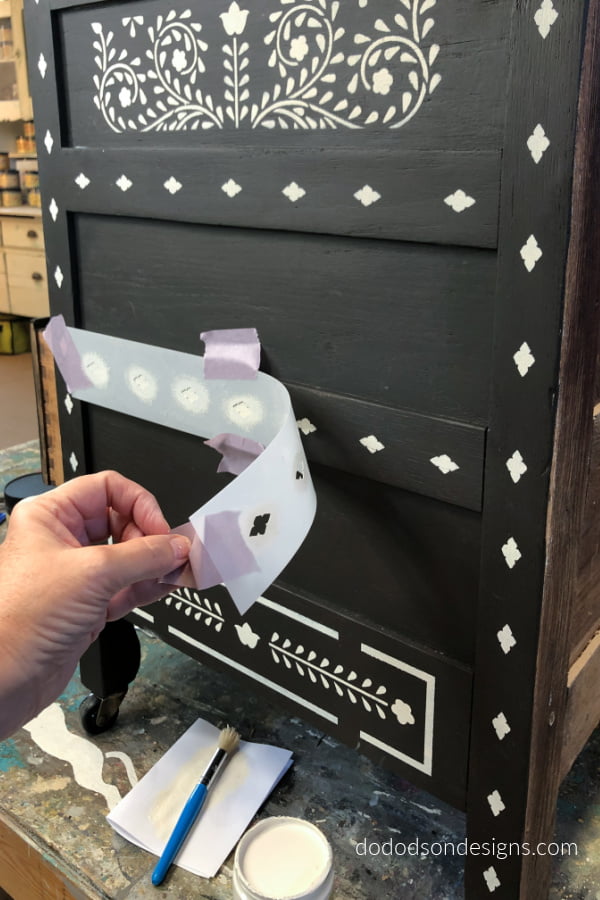
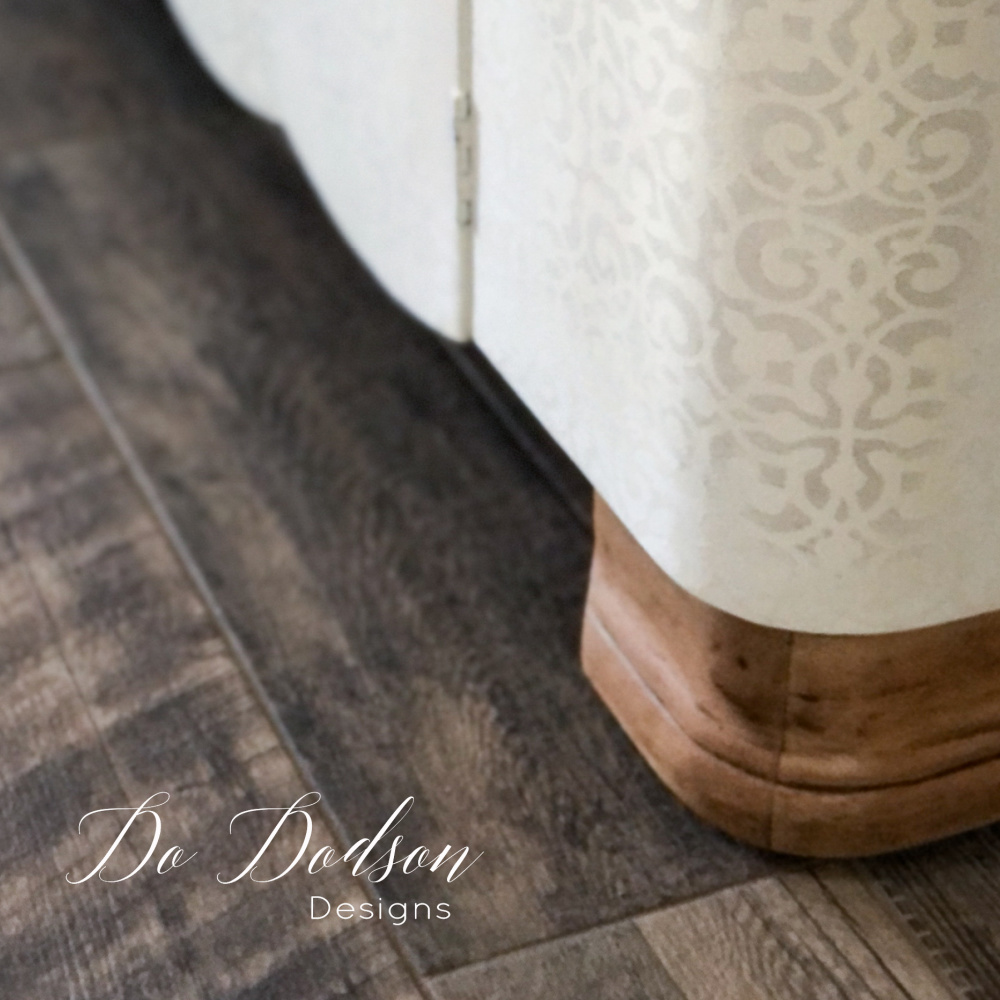
Here’s the fun part! You may have to do a bit of homework on this one as the stencils aren’t always the correct size. I sat down with the bone inlay stencils and made a diagram on paper before applying the design to the dresser. You can mix the stencils up by using a part of one and the other part of another. It’s okay if you have to trim the stencil to fit. I trimmed the small one to fit inside the panels and used a long tape to kill the design where I wanted it to end.
The beauty of this bone inlay design is that every inch is covered. It’s a very BUSY pattern and one reason I opted to use the black and white theme. I need it to blend well with my decor. Playing with these designs can be challenging and rewarding. I was obsessed with doing this dresser.
Helpful Tips
TIP #1
Chalk Mineral Paint is my choice for painting furniture and this DIY bone inlay dresser. While this paint doesn’t require sealing, you can apply a top coat of your choice. Dixie Belle has many options for you. You can find them here. Topcoats and Finishes
TIP #2
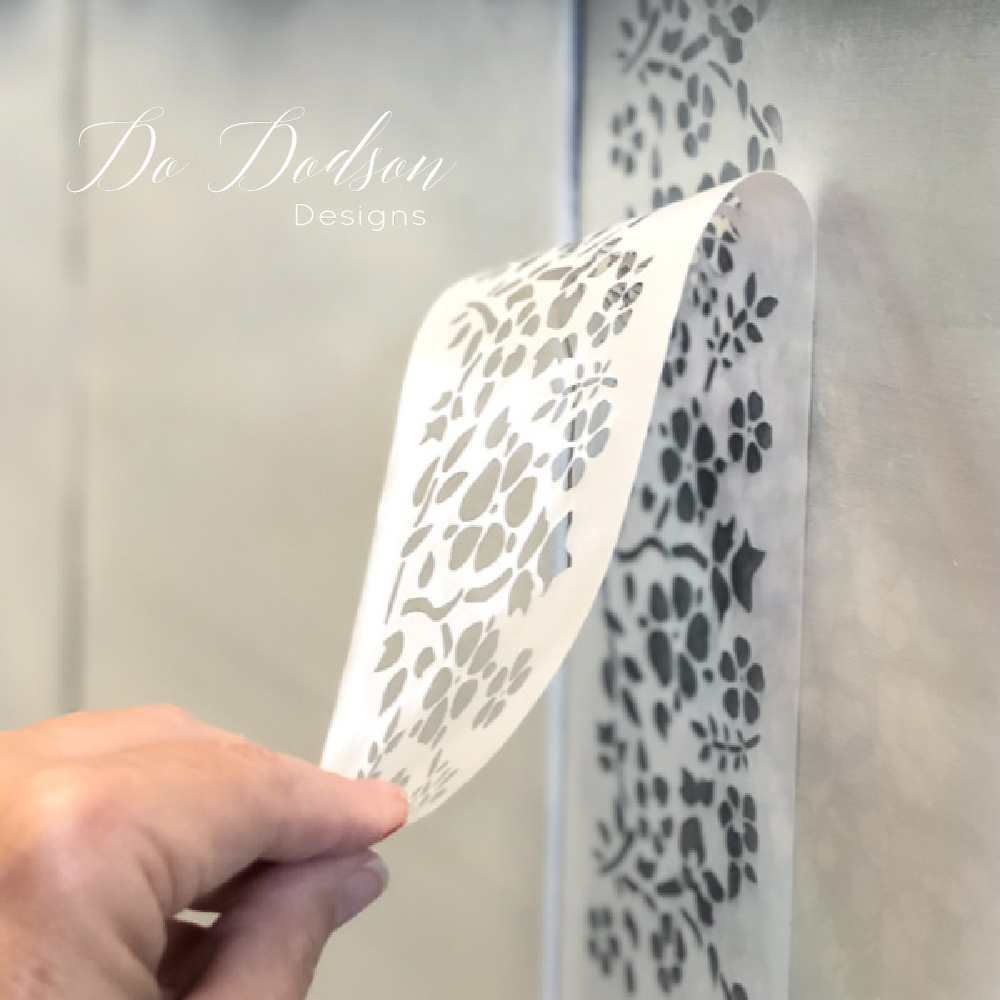
I use Scott’s gentle release tape (purple) to secure the stencil to the dresser instead of the spray adhesives to hold the stencil in place. I find it works just as well without the sticky mess left on the back of the bone inlay stencil.
TIP #3
After applying the paint to the stencil brush, be sure to “offload” it onto a paper plate or another surface. You will only need a minimal amount of paint on the brush. You can reload the brush with paint as needed.
TIP #4
When applying paint over the bone inlay stencil, use a tapping motion up and down… tap, tap, tap the paint over the stencil. You’re not painting but adding layers to cover the openings in the stencil. The first coat of paint over the stencil will not cover 100%, and it shouldn’t if you’re doing it right. It will take 2-3 coats. Your goal should be to get it covered without bleeding underneath the stencil. Please don’t overdo it with the paint. I can’t stress this enough.
Oh, it’s gonna happen. You’re going to pull back the stencil and see bleeding underneath. This is normal if this is your first attempt. I suggest you use a practice board before you attempt this level of stenciling. And remember, you can always repaint. Like with anything new, practice makes… OKAY. There is no such thing as a perfect stencil job, especially with a DIY bone inlay dresser.
TIP #5
The stencils are reusable if you care for them properly. This means you will need to clean them after every use. For the small stencils, I use baby wipes, and for the larger ones, I wash them in a large sink or bathtub immediately after use with mild soapy water, rinse and pat dry.
TIP #6
For storage, return them to the bag they came in to keep them clean and dust free. Lay them flat to prevent damage.
Finishing The Top Of The Bone Inlay Dresser
The traditional bone inlay dressers have the design on all dresser surfaces (even on the top), but I opted to be different. Shocker! After stripping the top of this oak dresser, I couldn’t resist. One coat of No Pain Gel Stain and a topcoat of Gator Hide was all it needed to bring it back to life.
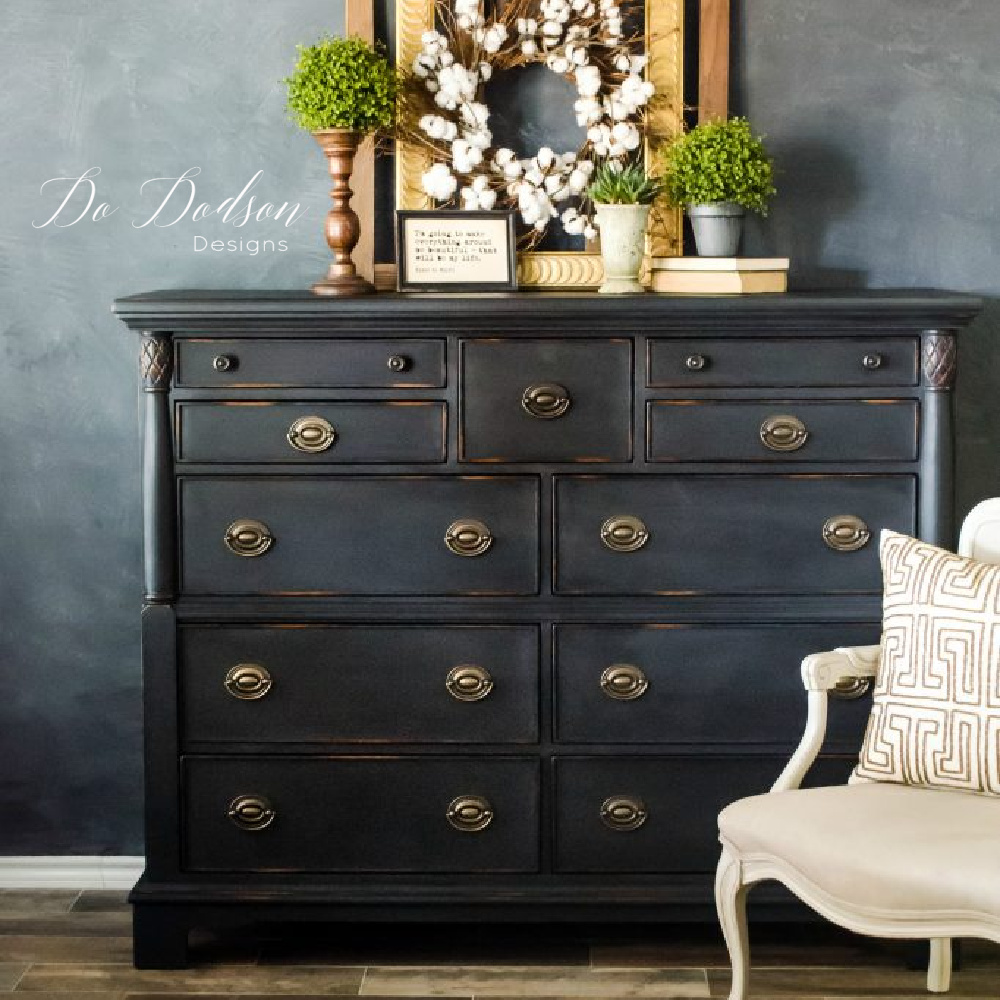
Chic Faux Bone Inlay Dresser
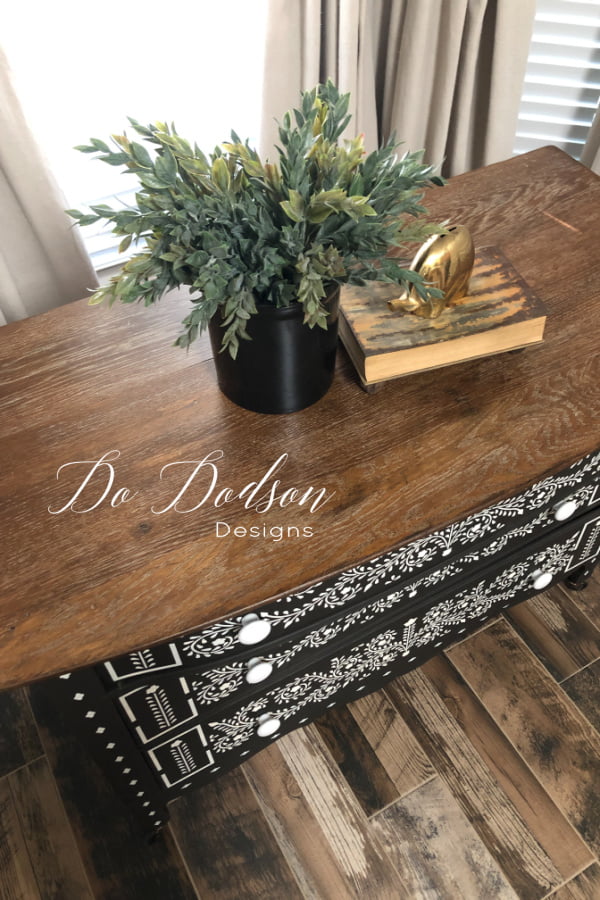
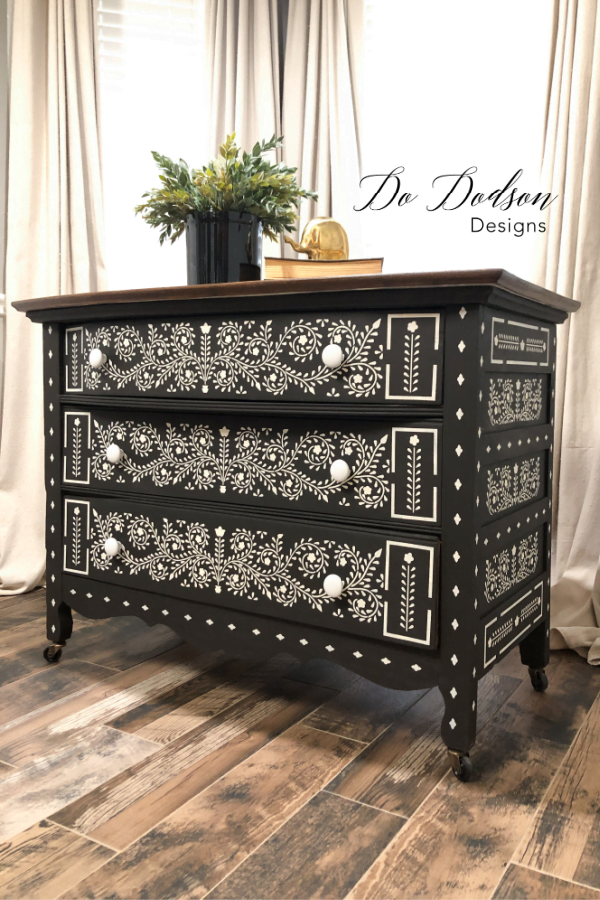
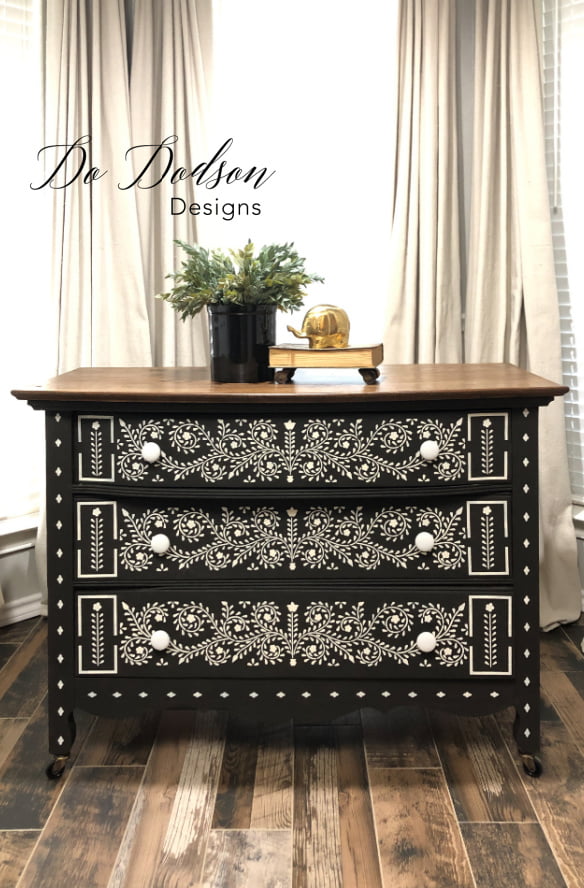
This stenciled bone inlay dresser is a contemporary statement piece with a chic and classic look. You may think this style is a bit much at first glance, but if your color palettes are neutral like mine, using neutral colors will make it easy to match your decor. The stencil design can be dressed up or down depending on the paint colors you choose. Gosh, I LOVE it so much!
Now, I need a favor from you… I was hoping you could share this post on your painted furniture board on Pinterest (sharing is caring), and let me know what you think about this design. I love hearing feedback on all my projects.
Until the next project… xo, Do
Oh my goodness!! This is stunning!
Thank you! It’s my new fave. 🙂
This is awesome! You do amazing work and make it sound so easy. Thanks for always being willing to share.
Hi Susie! Thank you but I have to admit it is tedious work. Not hard just a lot of repetition. Happy to share with you always. 🙂 xo
I can see why you love it Do. Absolutely gorgeous! XOXO
It always warms my heart to read your comments. 🙂 xo
Oh, my goodness…. It took my breath away
Beautiful, Donna, beautiful
Thanks, Glenda! Best comment ever. 🙂 xo
This piece is beautiful and one can’t help but stare at the intricate design. I really like that you stained the top. A lot of love went into that dresser!
Thanks, Joanne! Thank you so much. Yes, ma’am it sure did but I would do it again. 🙂
I love bone inlay designs. They’re so expensive. I bought someone’s hot glued particle board table that used a type of white puff paint to do the bone inlay type design. I bought it for $60 and I love this thing!! Now you’ve inspired me to do my own. Thanks fir explaining how to layer while stenciling- I never knew that.
Hi Lauren! I think you will be happy with the results. Thank much for sharing with me. Happy painting! 🙂 xo
So very beautiful.Thank you for the detailed explanation. The final result is artfully amazing.You are an artist Do.
You are welcome, Sohini! So glad you enjoyed it. 🙂
Beautiful makeover!
Thank you so much! xo 🙂
Magnificent – surely you didn’t sell it? In creating this you mention the ‘bone’ inlay stencil. Can this type of stencil be used for ordinary paint work or is it special to what you did? I’ve never actually attempted any thing but am teetering on the edge – I have a low, large solid wood, octagonal table. It is honey coloured wood that needs stains removed first. Then I fancy a design round the edge in a darker (but faded looking) stain design – keeping the rest of the table the honey colour. To do this could I use the darker stain with a stencil do you think. In my mind’s eye, it would be fairly subtle, sort of faded into the table…. Thanks for any thoughts.
Hi Audrey!
It’s good to hear from you. I did not sell it. I gave it to my daughter-in-law, that LOVES it. I have never used a stencil with stain, and due to the stain being thinner than paint, I’m afraid the results may not work out. But you have me thinking. You might try a gel stain that is thicker than a traditional stain. Absolutely do a test piece first. I’m excited to hear how this all plays out. Please keep me posted, and best wishes on your project. Send pics.
🙂 DO
I would like the 5 piece bone inlay stencil that is in the ad. Can you email me and let me know how I can purchase it? Thanks, Karen
Hi Karen,
The link was under the products list. NO worries. Here is my Amazon affiliate link for purchase. https://amzn.to/4efuKpO
I hope this helps. 🙂
Wow! Really cool and so unique at the same time. Thanks for he tips and inspiration! Can’t wait to try this idea on an old distressed dresser in the living room.
Hi Don! Thanks for reading. It’s a great way to cover up flaws too. Have fun creating your masterpiece. 🙂