
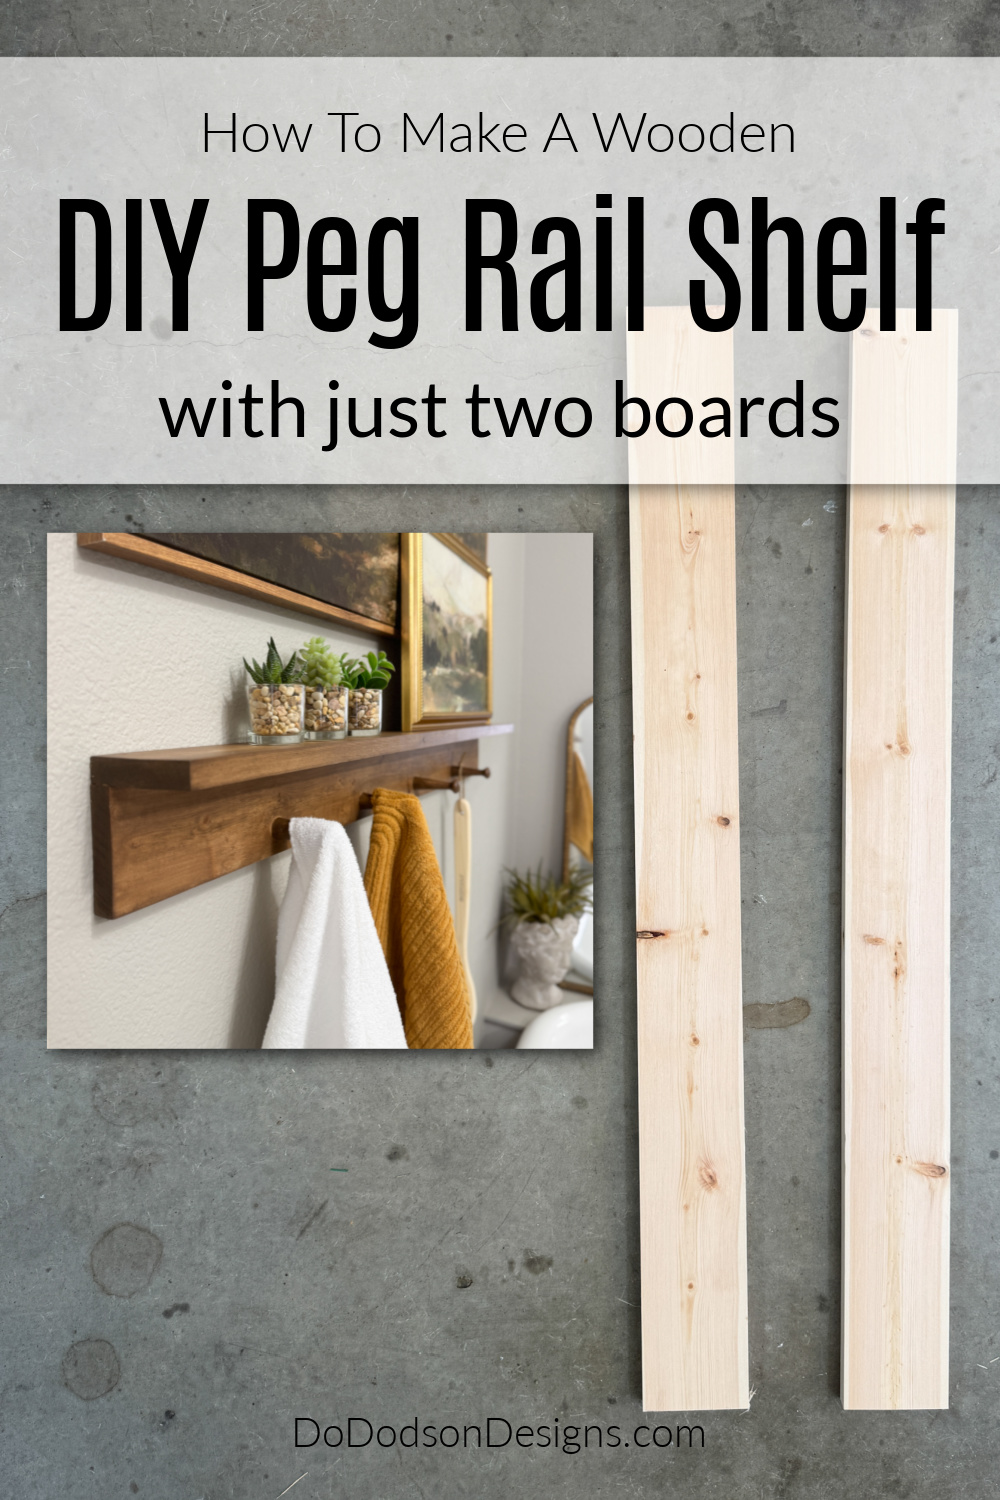
Hey friends! Today, I’ll show you how to make a shaker peg rail shelf in just a few easy steps. This simple DIY woodworking project is perfect for adding a touch of rustic charm to any room in your home. Especially the bathroom.
Thanks to Dixie Belle Paint Co. for sponsoring this post. While I was compensated to write this post, all opinions are my own.
* As an Amazon Associate, I earn from qualifying purchases and through other companies as well. You will not be charged extra when you purchase through these affiliate links, but any income I make helps me create more amazing DIY projects to share with you! To see my full disclaimer, click here!
Shaker Peg Rails (History And Background)
The Shaker Peg Rails, also called Shaker Peg Racks (they go by many names), were named after the Shaker community that originated in the 18th century.
Made from durable oak and maple wood secured into the wall studs, it was strong and sturdy enough to handle a lot of weight. The Shakers believed in making things that serve a purpose. And I think this was an exceptional product.
The shaker peg shelf takes me back to my childhood. I remember one hanging in our entryway where we hung coats in the winter.
I still see these Shaker peg rail shelves being used in today’s styles. It’s a simplistic, minimalist style—a timeless, functional style and design that has withstood the test of time.
Need more shelf inspiration? Here are a few more DIY projects you might enjoy.

Materials Needed To Make A Shaker Peg Rail Shelf
- 1X4 wood (I used poplar wood)
- tape measure
- saw
- carpenters pencil
- Electric Wood Sander (220 grit paper): My preferred Sander
- finish nailer or screws
- wooden shaker pegs or wall hooks
- wood glue
- fine mist spray bottle
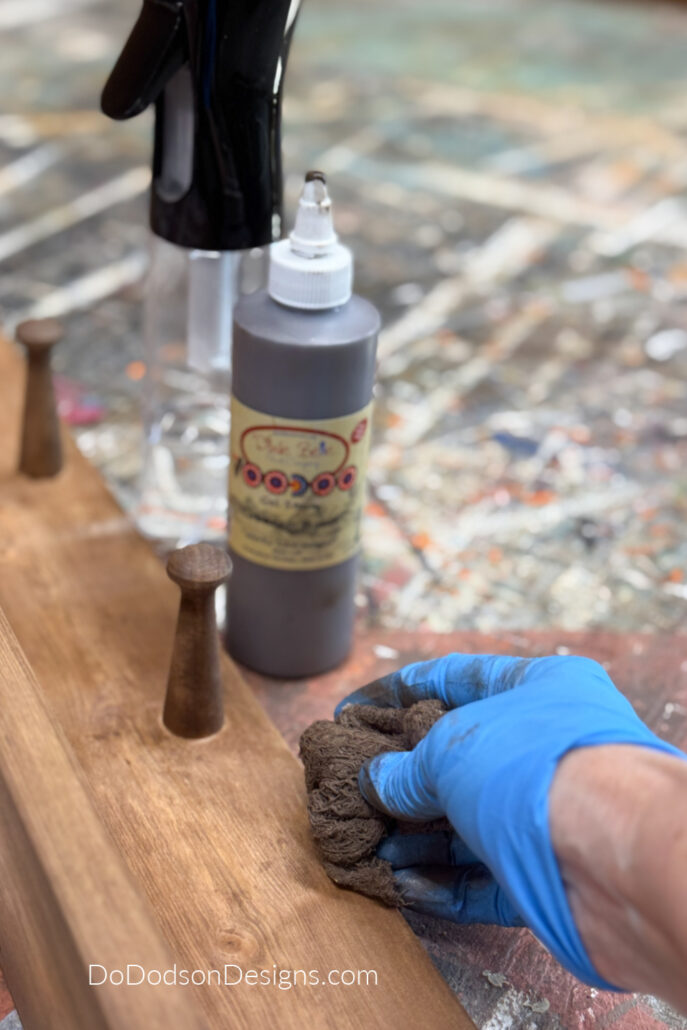
- Charred Hickory Dixie Belle VooDoo Gel Stain
- clean cotton cloth or paintbrush (to apply wood stain)
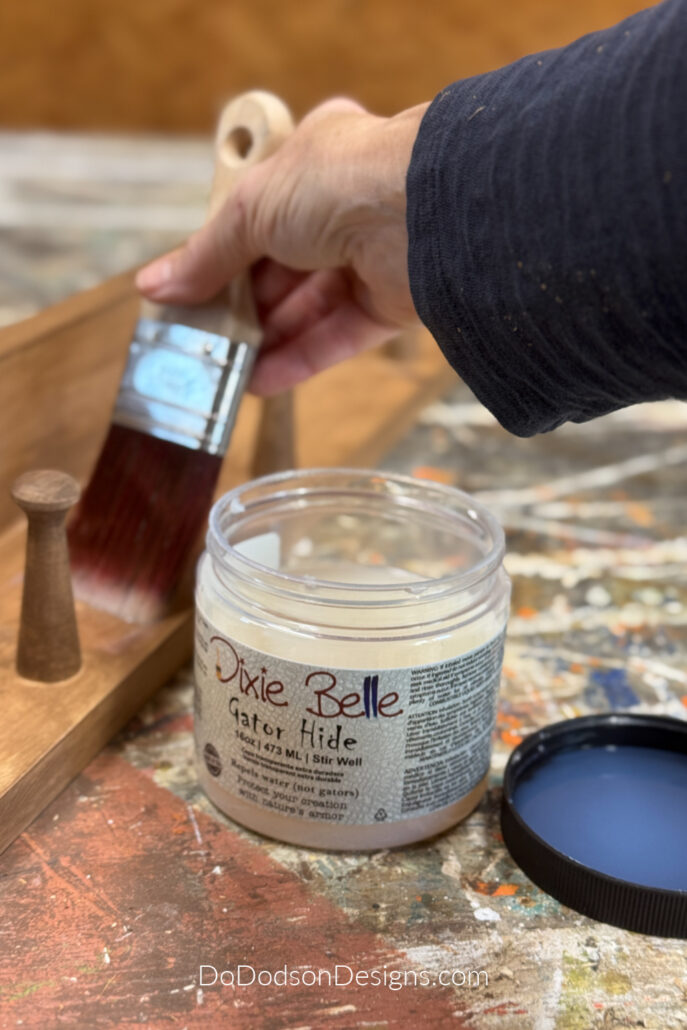
- Gator Hide Dixie Belle Clear Water Repellant Top Coat
- 2-inch mini-angle paintbrush
- drill and wood drill bit
- hammer
- sheetrock anchors and screws
- wood button plugs
Measure And Mark The Wall For The Shelf
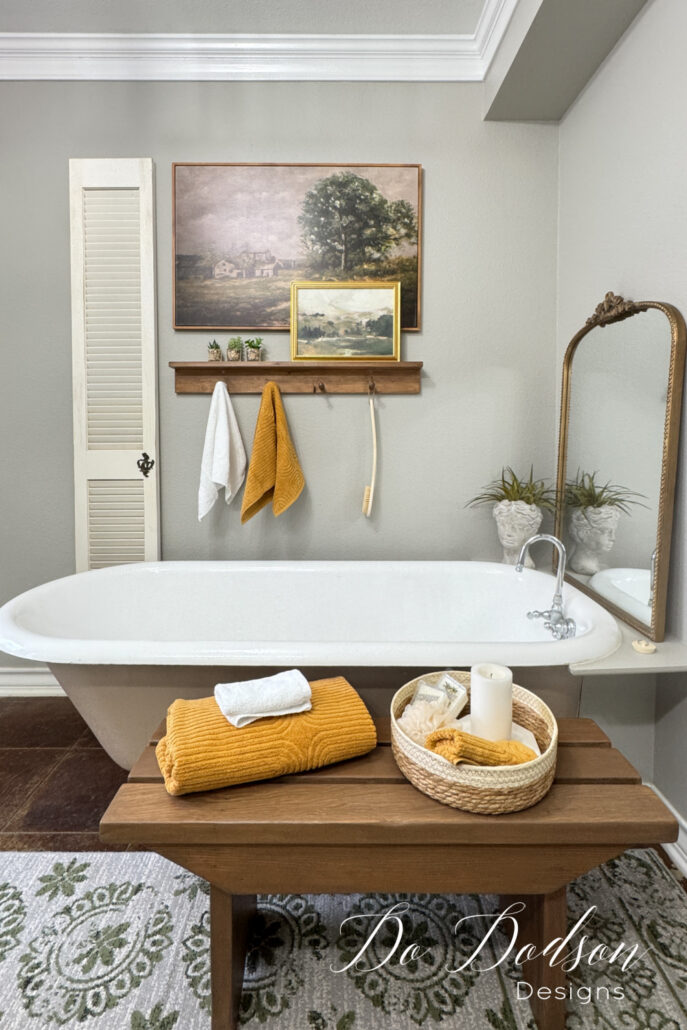
The wall next to my clawfoot tub in our master bathroom is where I envision a shelf. Honestly, I don’t use this tub much, but that naked wall was distracting me. Every time I walked into the bathroom, there was a blank slate. Decorating opportunities! And I might consider using this tub if…
So, of course, I went digging on Pinterest and found this simple wooden shelf idea.
The first thing I did was to determine the width of the shelf I needed in my bathroom. I decided on a custom length of 36 inches for my space. That’s what I love about this DIY project; you can customize the length to fit your exact needs.
DIY Shaker Peg Shelf Tutorial
Who would have thought that two boards could make a shelf? Obviously, the Shakers did.
Some leftover wood from a previous project (save those scraps) worked perfectly.
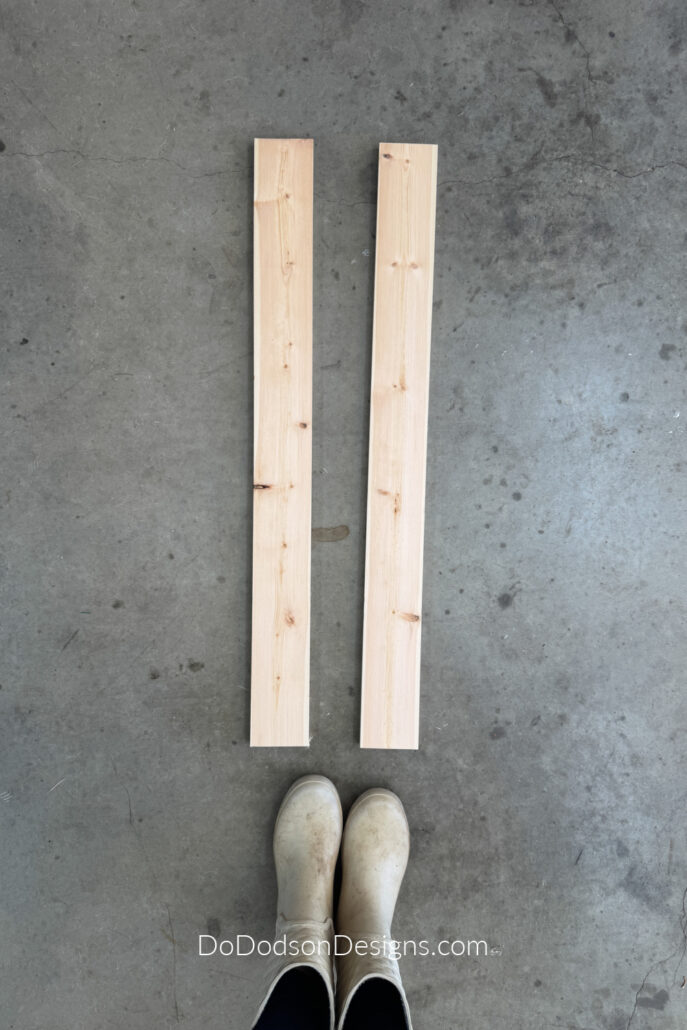
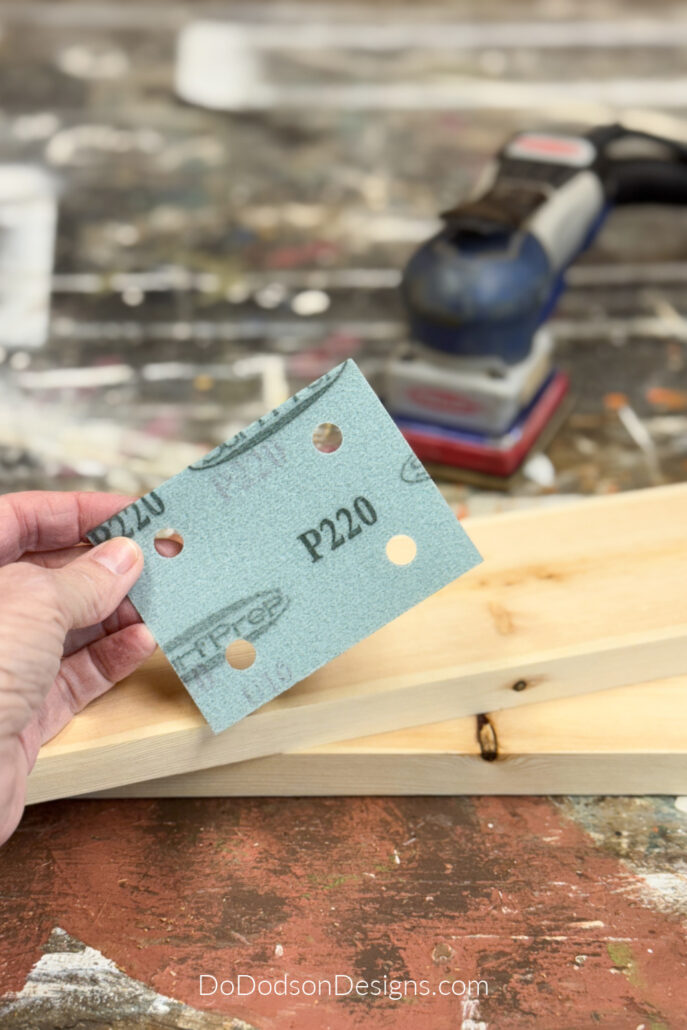
After cutting the two boards to 36 inches each, I lightly sanded the wood with 220-grit sandpaper.
Wipe away any remaining dust with a clean cotton cloth to prepare the wood for paint or stain.
Assemble The Wood Shelf
This will be the easiest DIY wood project you will ever build. It’s beginner-friendly and is great for getting your feet wet with woodworking.
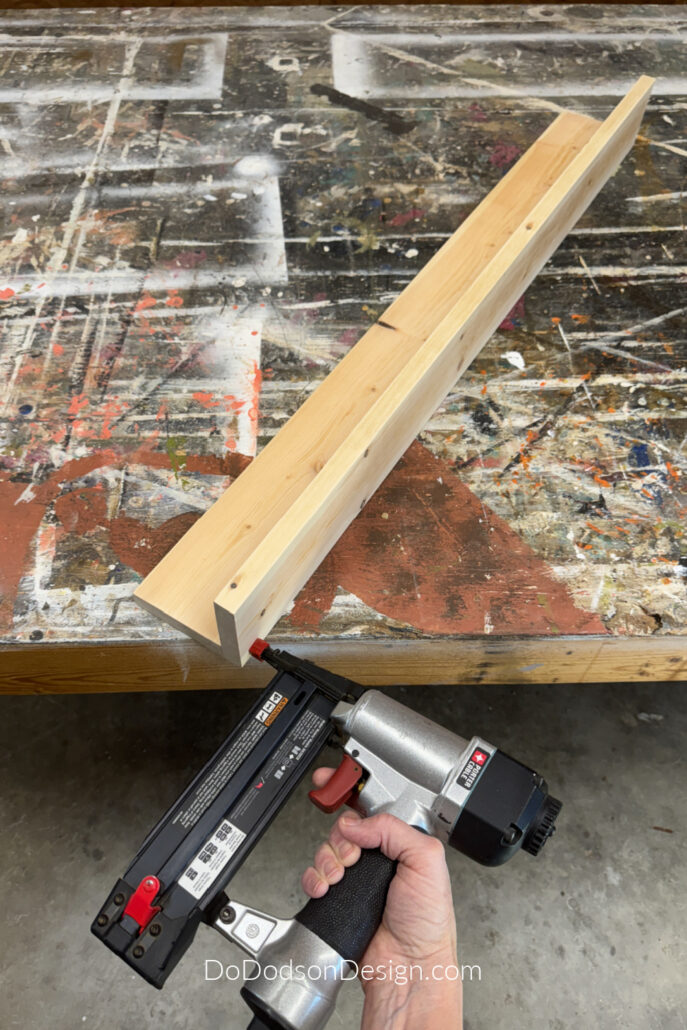
Grab your wood glue and place a fine line (a small amount) along the underside of the top piece of the first board. This will be the shelf’s top underside.
Be careful not to use too much glue; it could bleed out from underneath and soak into the wood. If this happens, use a wet cloth to wipe it away immediately. Leaving glue on the wood surface can affect the paint or stain, causing an uneven finish.
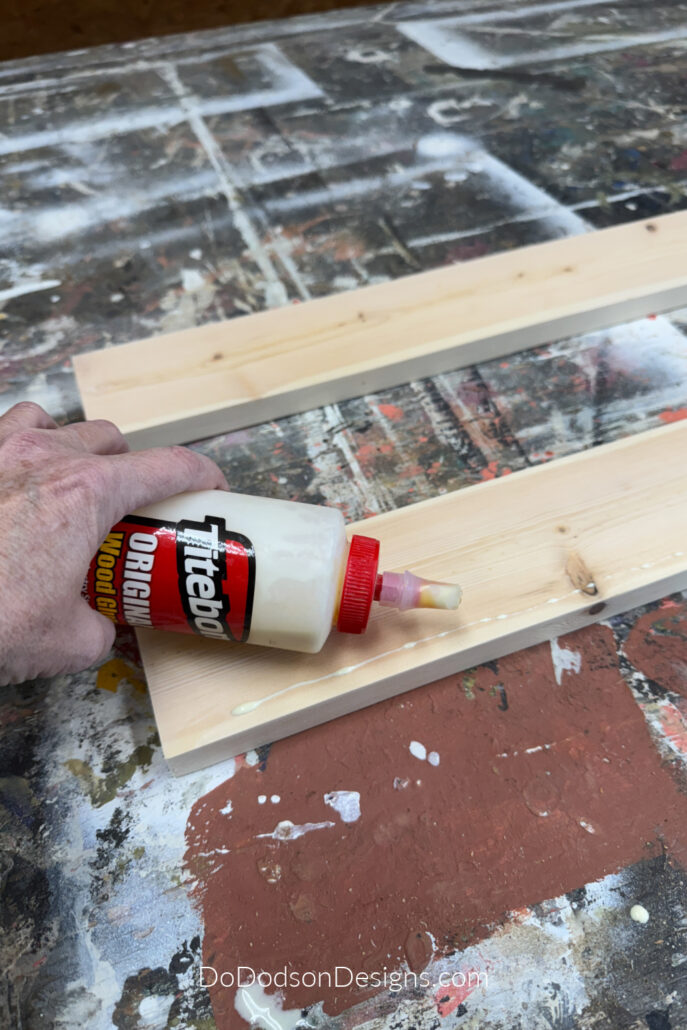
Next, add the second board under the top piece. This is the board that will sit against the wall.
Now, the wood glue itself isn’t enough to make the bond between the two boards strong, so I suggest you use screws to secure it from the top or, like I did and use a finish nailer. I like this method because you can backfill the tiny holes with wood filler.
Allow the two boards to dry overnight.
Attaching The Shaker Pegs
I found these solid wood pegs on Amazon that already have wood screws attached. That makes the installation super easy.
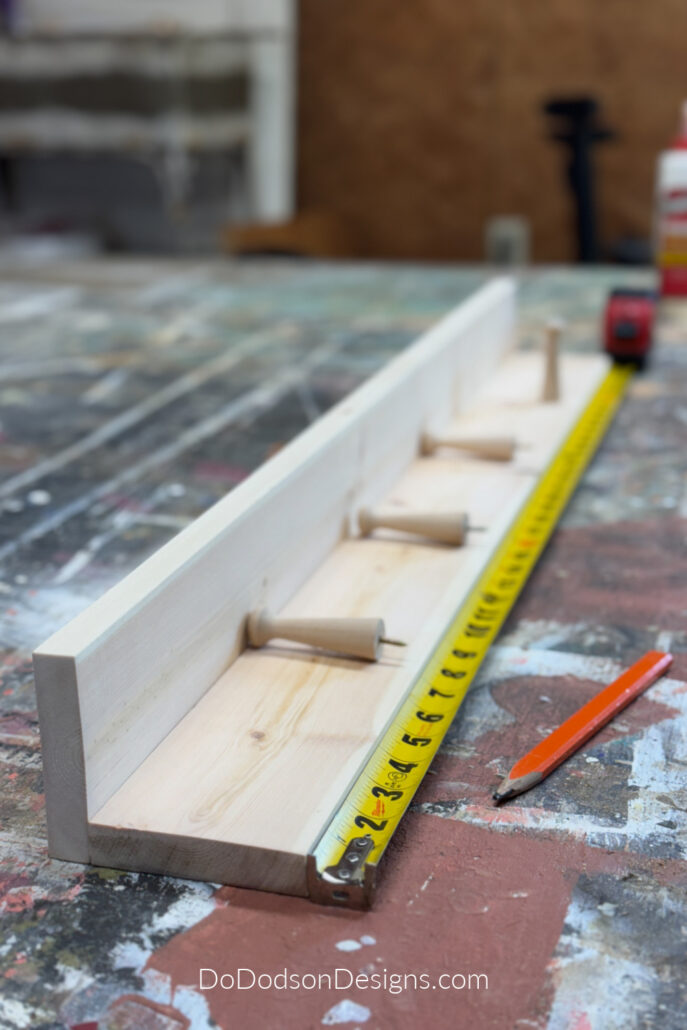
After measuring where I wanted the peg holes, I had to determine the number of pegs I wanted on the rail.
There is no standard peg spacing, but I wanted four pegs spaced enough to hang towels from.
I divided 36 inches (the board length) by 5 (the spaces between the pegs I wanted), which is 7.2 inches = the distance between each peg and the end of the board.
I marked where I wanted the pegs with a pencil and pre-drilled small pilot holes with my wood bit and drill. This helps the screws on the pegs to go into the wood quickly. Twist them slowly into the board by hand.
Paint Or Stain Wood Boards
If you want the traditional wood style, you can build your Shaker Peg Shelf using oak wood or maple. I decided to use some leftover scrap wood from Poplar for my shelf. It’s a great option; this wood can be painted or stained.
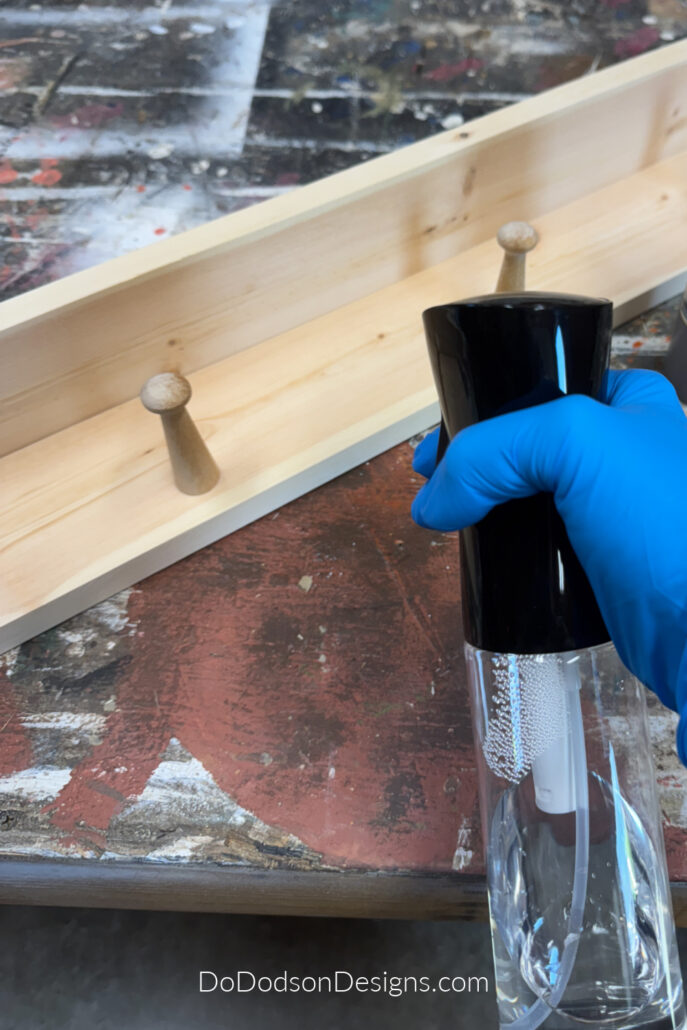
The first step is to wet the wood with water. This will ensure the stain doesn’t absorb too quickly, giving you more work time. The best method is to use a fine-mist spray bottle. Lightly and evenly mist the wood with water.
Next, apply the VooDoo Gel Stain directly to your wood project. Then, work the stain into the wood in the direction of the wood grain with a clean cotton cloth, gauze, or even a paintbrush. Wipe away any remaining gel stain with a clean cotton cloth. Allow it to dry thoroughly.
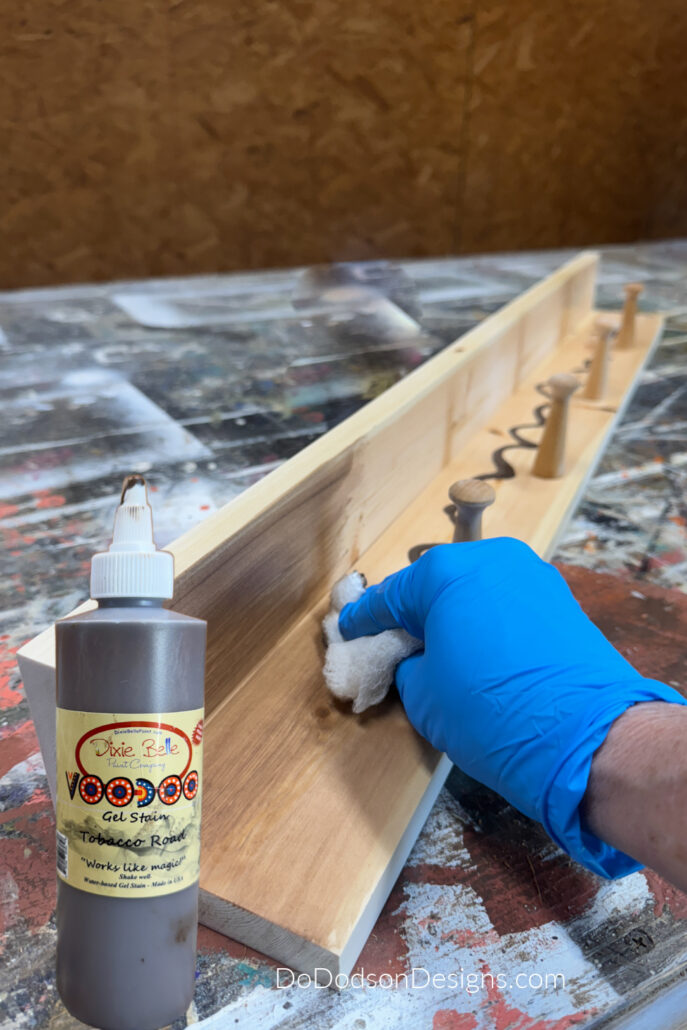
If you want a darker stain color, apply a second coat—that’s what I did here. It’s totally up to you. This stain is designed to be layered.
Adding A Clear Top Coat For Durability
After the stain has had ample time to dry, apply a clear top coat for durability. I prefer Dixie Belle Gator hide due to its water-repellent properties.
Apply Gator Hide with a good-quality paintbrush, using a very light coat. Allow it to dry, then apply a second coat.
This top coat was the perfect choice because this bathroom shelf will be exposed to humidity.
Mounting The Peg Shelf On The Wall
The traditional way of mounting a Shaker Peg Rack shelf is to screw it directly into the wall studs. Wall studs are typically 16-inch on centers.
If you don’t want to go that route and your wall is made from sheetrock, use sheetrock anchors and screws to secure it to the wall.
You can find wall anchors or sheetrock anchors at your local hardware store.
Once you’ve established the mounting hole locations, predrill holes in the shelf. You’ll want to counter-sink the screws if you don’t want them visible and insert wood button plugs stained or painted to match the shelf.
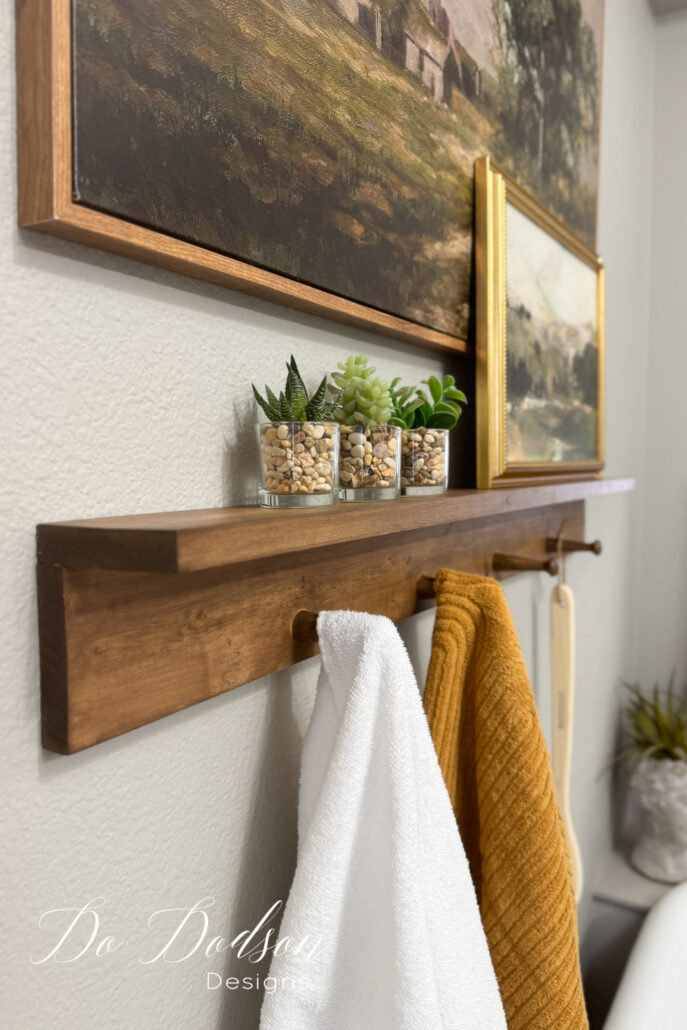
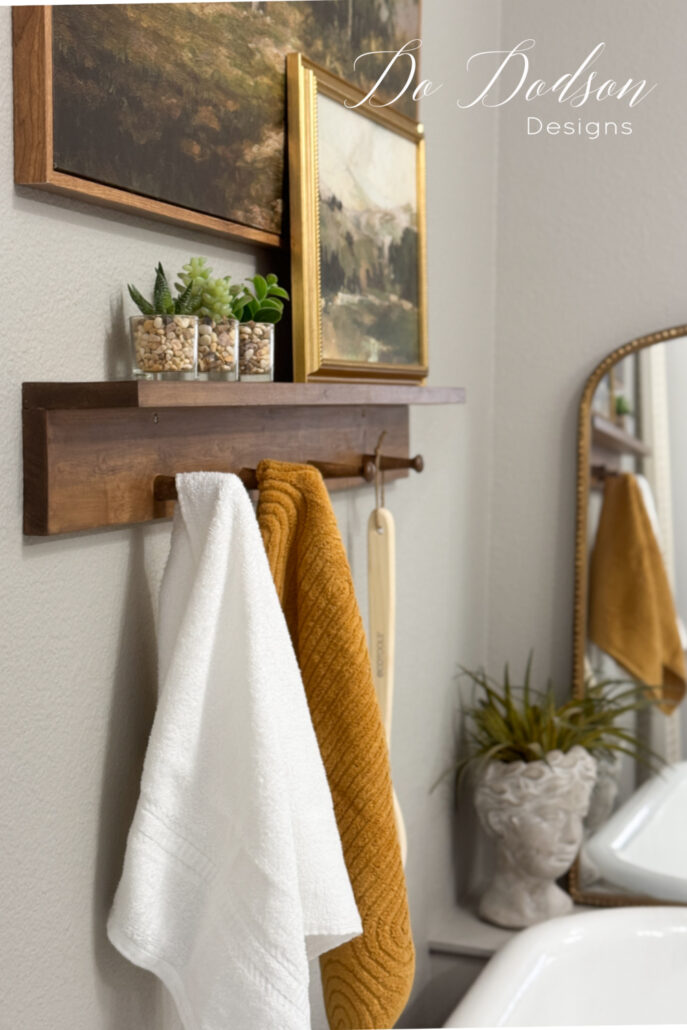
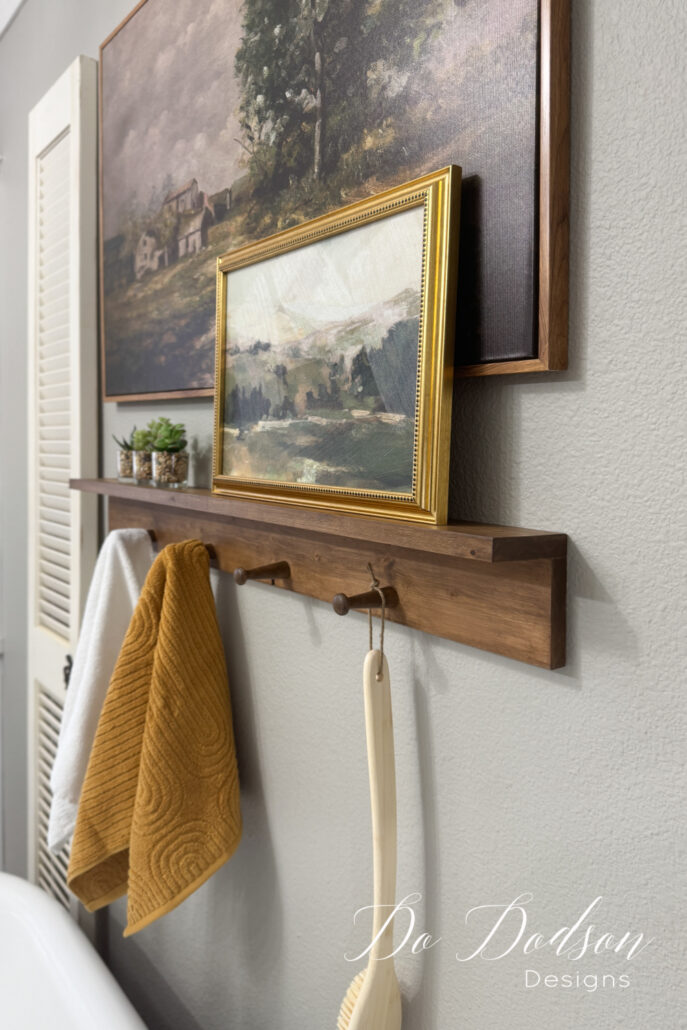
The Shaker Peg Rail Shelf
This naked wall had been an eyesore for three whole years. Can you believe it’s been that long since we purchased our Forever Ranch Home? Wow! Time needs to slow down, or I’ll never get it all done.
To say I’m happy about having a peg shelf over my tub is putting it mildly. Here’s what I love about it.
I can use it as decor, and it’s functional! That’s my kind of decor. 🙂
Styling Tips
Consider hanging artwork above or sitting it directly on top of the shelf.
Add a variety of textures and a color scheme that complements your space. Arrange objects in numbers of three to create visual appeal.
Hang the things you love from the pegs you can use that add to the room’s decor.
For example, try hanging a small basket filled with things you use every day, such as your favorite soaps or bath bombs. If it’s somewhere you need to be, hang a scrubber brush there too. Either way, make sure the items are within arm’s reach.
I haven’t found the perfect basket to hang from mine yet, but I’m looking.
This spot brings me so much joy now, and I can’t wait to take a bubble bath in this claw-foot tub. It will be my Friday night hangout, for sure.
Thank you for joining me today. I hope you enjoyed this tutorial on making a Shaker peg rail shelf. Do you think you could use a shelf like this in your home? Let me know in the comments, and don’t forget to share this simple DIY woodworking project with your best DIY-loving friends.
Saying hi in the comments counts too. 🙂
Until the next project… xo, Do
This is really nice – I love the look and think I could do it myself. Thanks!
Hi Marion,
I’m glad you liked it. Our goal here at Do Dodson Designs is to create do-able DIY projects that others can make too. I think you’ll enjoy the shelf.
Enjoy your weekend. xo, Do 🙂
Your bathroom is lovely, and I’m envious!
Hi Rebecca! Thank you! I just noticed in the after photos you can’t see the claw feet on the tub. That’s the best part. 🙂
Enjoy your weekend and thanks for reading. xo, Do 😘
Do- Of all things…this is exactly what i have in mind for my bathroom also! What perfect timing!!! Now I know exactly what to do and how to do it! Thank you so much!!!!!
Hi Tess! Yay 🙌🏻 for perfect timing. I love when a plan works out. Have fun making your shelf. Please share a photo with me if you think about it. I’d love to see it. 🙂
I love claw foot tubs – they are so vintage lux imo! Your bathroom is beautiful and the bench and this shaker shelf is such a wonderful addition. Gorgeous Do… and easy to follow DIY tutorial, thank you!! 😊 💙💙
Hi Denise! Thank you so much for reading. I just noticed that the feet weren’t in the photo. Bummer. They’re silver but I have plans to repaint them gold. I’ll let you know when I do. 😉