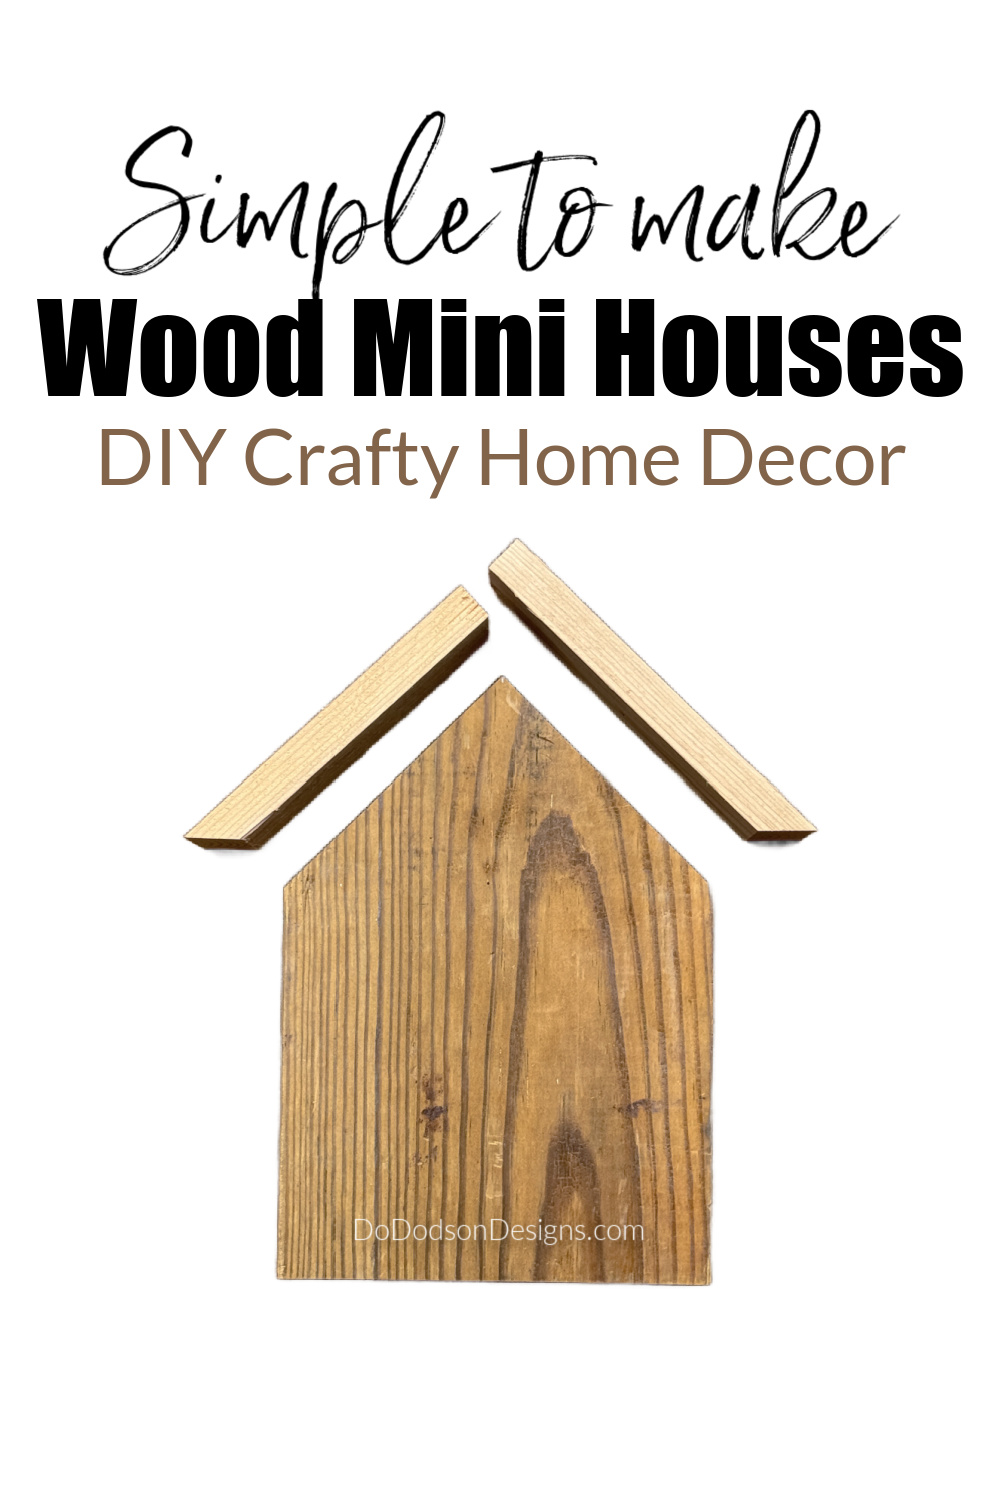
Hey, crafty friends! You’ll love this simple DIY project if you’re into upcycling and love wood crafting! I’ve always said, “I’ve never met a piece of wood that couldn’t be transformed into a new life.” In today’s post, I’ll show you how to transform those wood scraps into mini wood houses. It’s a great way to practice upcycling and woodworking while creating amazing home decor.
Thanks to Dixie Belle Paint Co. for sponsoring this post. While I was compensated to write this post, all opinions are my own.
* As an Amazon Associate, I earn from qualifying purchases and through other companies as well. You will not be charged extra when you purchase through these affiliate links, but any income I make helps me create more amazing DIY projects to share with you! To see my full disclaimer, click here!
From Scrap Wood To Creative Decor
Scrap wood is my choice for quick and easy DIY home decor projects. Who doesn’t love the thought of creating their own unique style?
Some people think I’m a little crazy about repurposing stuff (especially scrap wood), but I don’t care. I’m so proud of how our home looks and even prouder that I didn’t spend a fortune decorating it. Most of our family members and friends don’t even know that my home décor is stuff I’ve recreated. Well, except for you. 🙂
Well, are you ready to learn how to make mini wood houses out of leftover lumber? You’re just two cuts away from decorating your home with classy wood decorations. Let’s get started!
If you’re looking for more fun and easy crafts! Here are a few more of my favorite DIY projects that will add a splash of personality to your home.

Material List:
- 2×8 boards 10 inches (scrap wood pieces)
- 1×3 boards (roof) 7 inches and 6 inches
- Miter Saw
- Sandpaper or my FAVORITE Electric Sander ❤️
- Bonding BOSS (bonding primer and stain blocker all in one)
- Cotton (Dixie Belle Chalk Mineral Paint)
- Bunker Hill Blue (Dixie Belle Chalk Mineral Paint)
- Barn Red (Dixie Belle Chalk Mineral Paint)
- Golden Ash (Dixie Belle No Pain Gel Stain)
- Synthetic Chip Blush
- Artists Brushes (for details)
- Painter’s Tape 1.4 inch
- 1-inch Star template from Monday Mandala
- chalk sticks
Mini Wood Houses (Patriotic Decor Ideas)
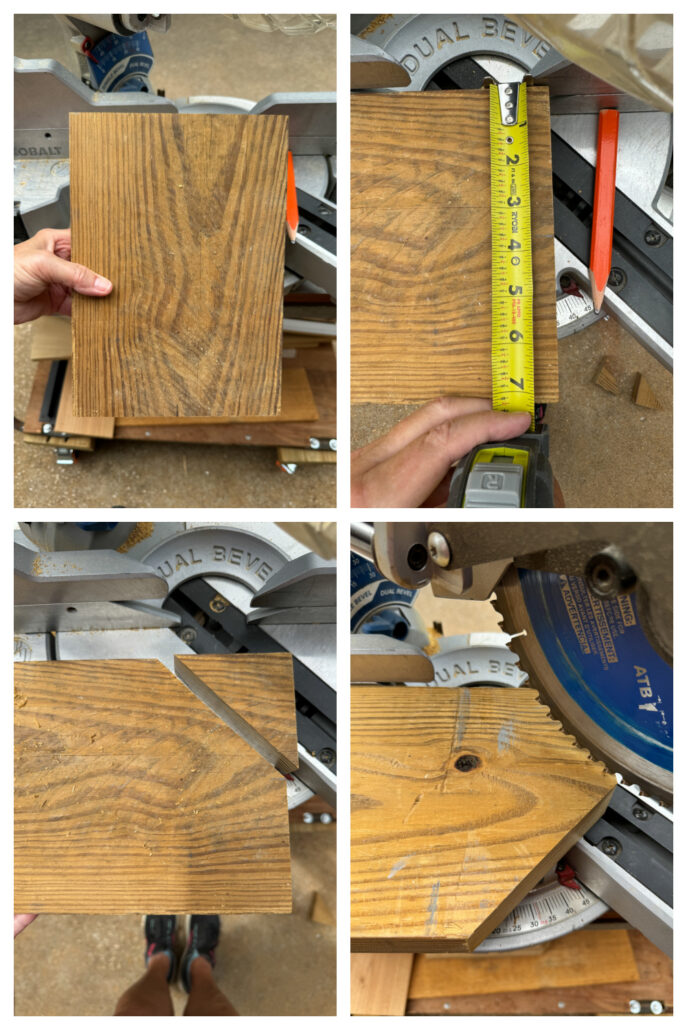
STEP 1:
Cut two 2×8 boards 10 inches in length.
Find the center of your 10-inch 2×8 boards and mark them with a pencil.
Set your miter saw to a 45-degree angle. This will be the pitch of the roof line.
Next, cut the board at a 45-degree angle from the center mark, creating the roof slop. Repeat the same angle on the opposite side. Now you have a simple mini woodblock house.
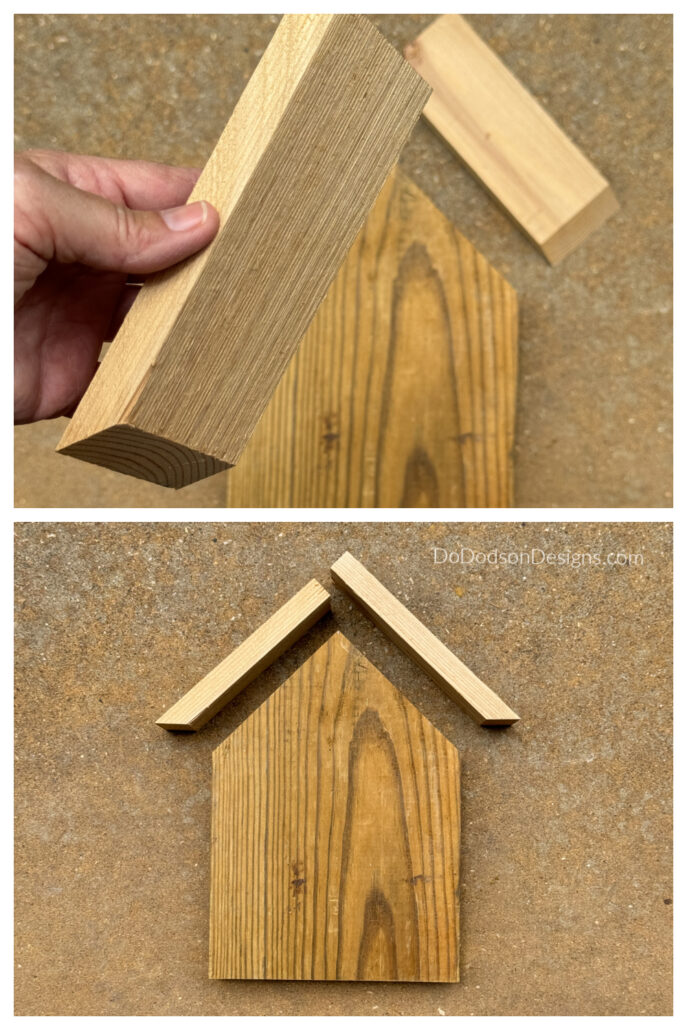
STEP 2: OPTIONAL
Cut one 1×3 board 6 inches long and one 7 inches long to make a wood roof. When placed on top of the mini wood houses, overlap the longer board to compensate for the extra one inch.
You can use any size of scrap wood. I just happened to have these pieces lying around.
Take your little houses to the next level by cutting a 45-degree bevel on each end of the roof boards for a finished look.
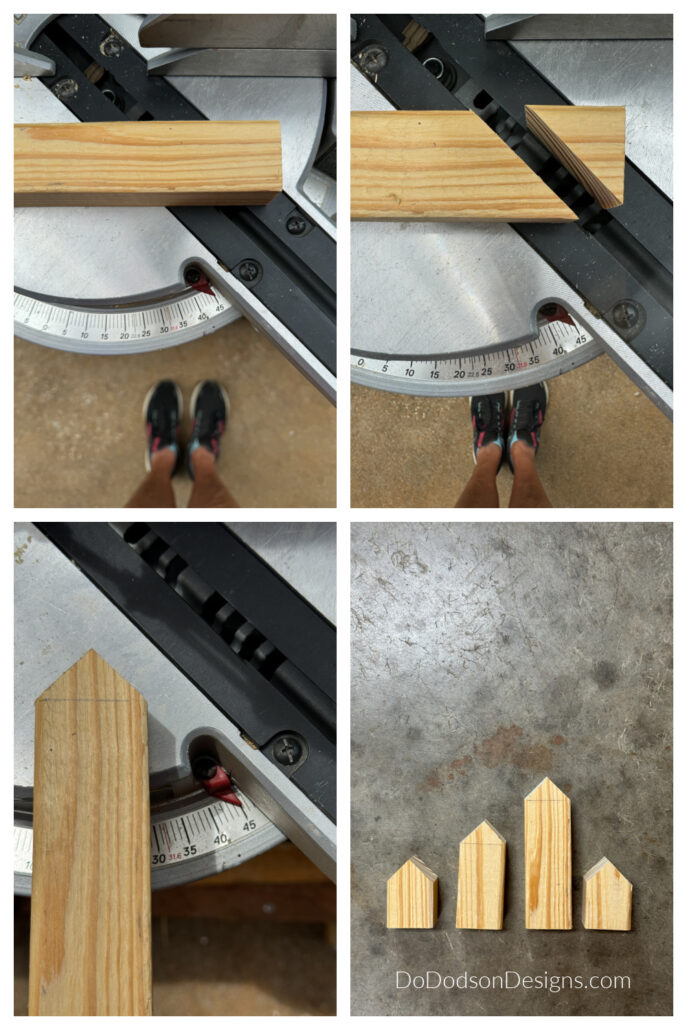
More Tiny Mini Wood House Ideas
Here are more of my mini wood houses, which you can make in minutes. This easy woodworking project is great because it’s very customizable, depending on what kind of scrap wood you have. So get creative and have fun with it. Using aged barn wood adds a touch of rustic farmhouse charm.
You can make a whole town of mini wood houses that are kid-friendly! With decor like this, I never worry about how rough my grandkids play in the house. Kids will be kids. What happens at Grandma’s stays at Grandma’s.
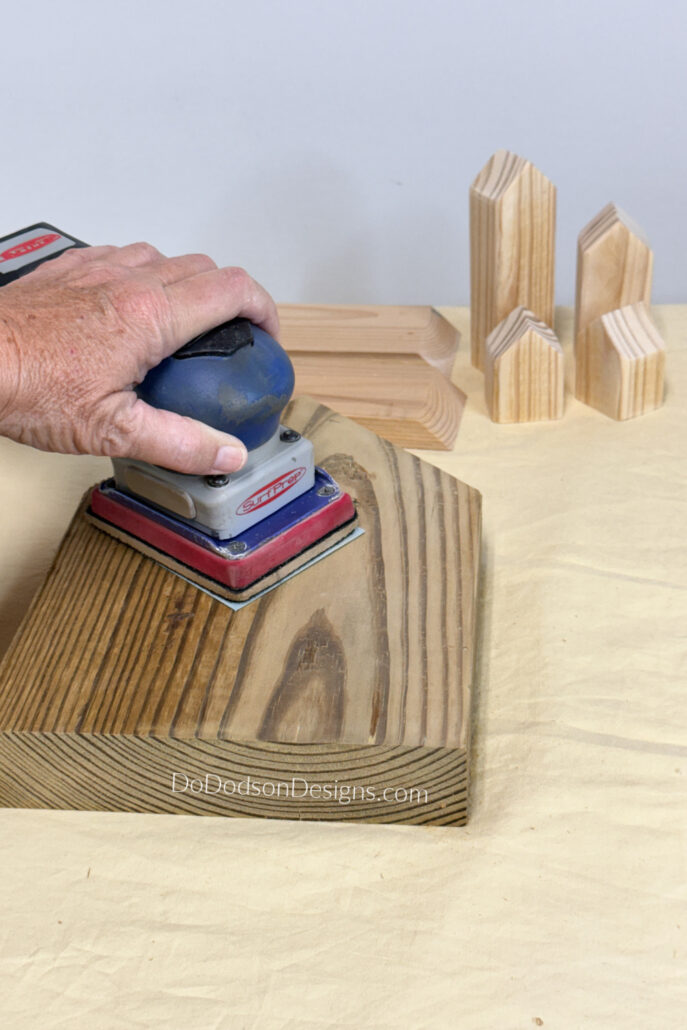
Sanding Before Paint or Stain
STEP 3:
Lightly sand the mini wood houses with 220 grit sandpaper until the wood is smooth.
Remove any leftover wood dust from the mini wood houses by gently blowing or simply brushing it away with a dry paintbrush.
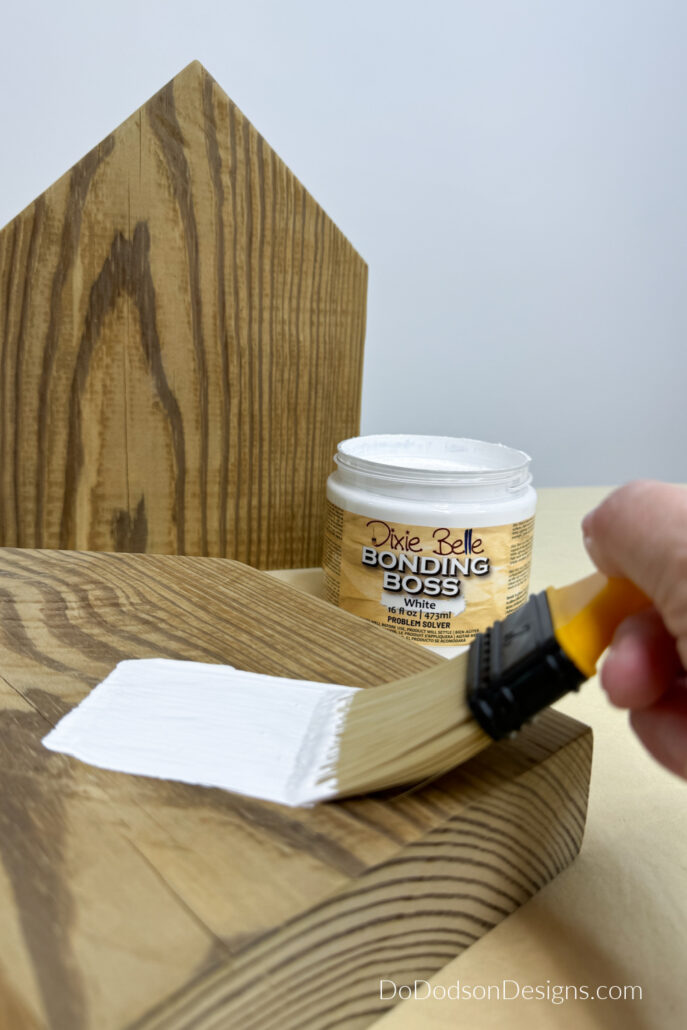
Stain Blocking Primer On Raw Wood
I’ve decided to use my DIY mini wood houses on my patio table for this Fourth of July celebration. The whole family will be here, so I want my table to represent. Red, white, and blue it is!
STEP 4:
Before painting my patriotic designs (American Flag) on the wood blocks, I need to apply a stain blocker to prevent the wood tannins from bleeding through the paint, especially when painting with lighter colors, such as white. Nothing is worse than waking up the next day to find stains that reared their ugly heads on the surface of your beautifully painted project.
Apply two coats of a quality stain blocker to the wood. Today, I’m using Dixie Belle’s BONDING BOSS. It solves those problems before they happen.
Patriotic American Flag Design
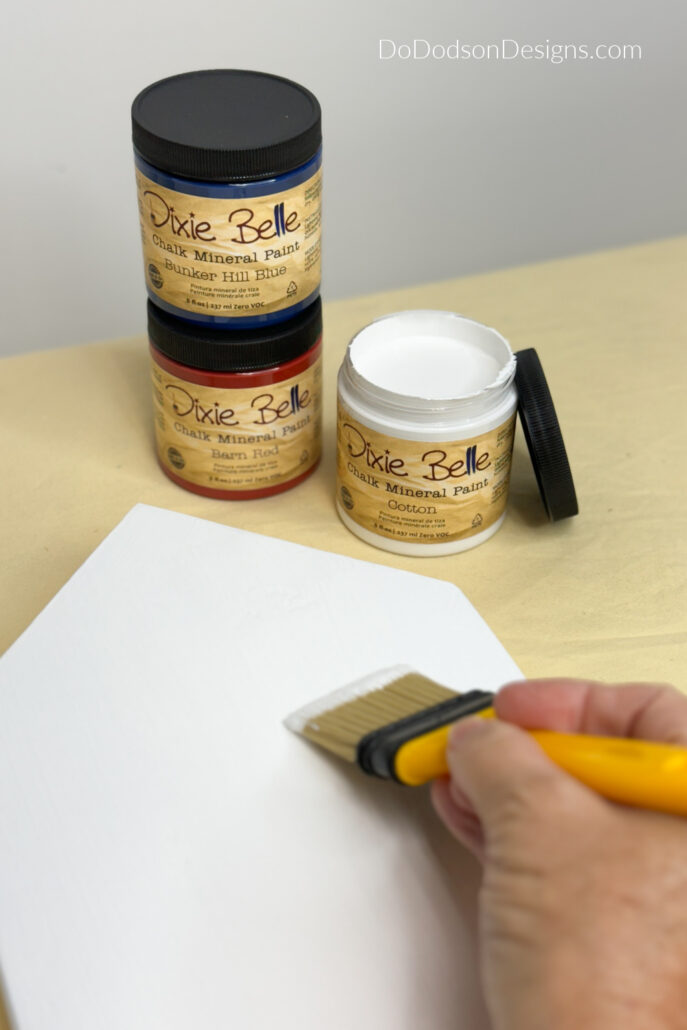
STEP 5: BLOCK #1
Paint the first block (white) with cotton chalk mineral paint. Two coats are best for the best coverage, but since I used a white stain blocker, one coat covered it well.
Allow the paint to dry completely overnight. There’s no rush to paint and decorate your wood houses. Take your time and enjoy the process.
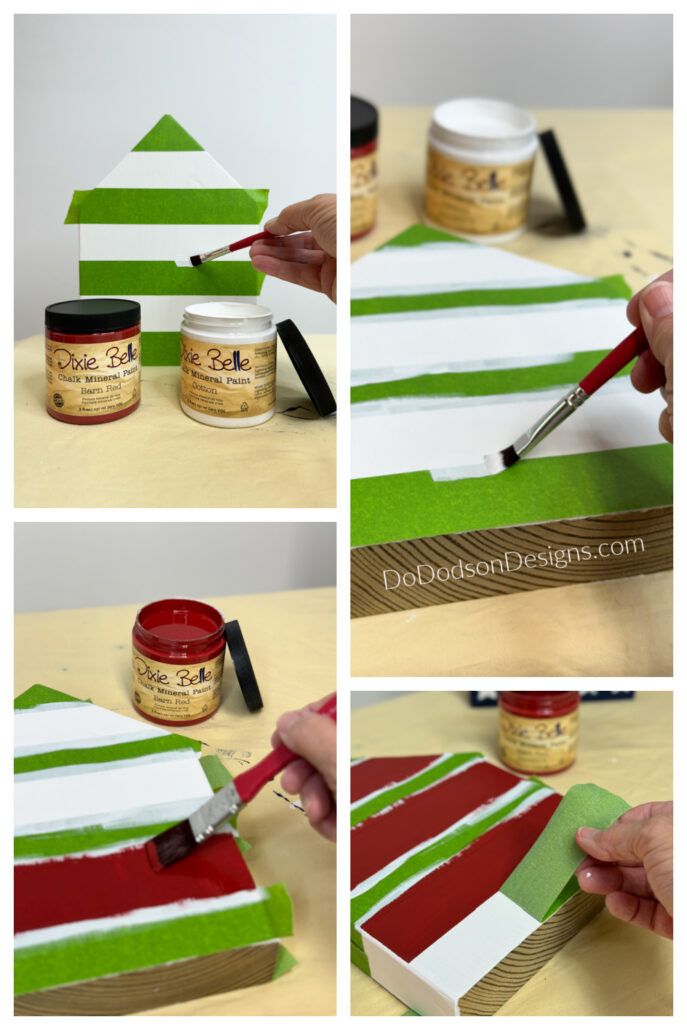
I used frog tape to create the perfect stripes for my flag-inspired project. Be sure to burnish the edges of the tape to ensure good contact.
Using the same white paint as the base color, I added a thin layer over the taped edges and allowed the paint to dry. This helps prevent a different paint color from bleeding under the tape and gives you a clean, crisp line.
Now, you can safely paint the stripes the color of your choice without worry. Remove the tape immediately after painting the stripes. If you paint a dark color over white, you may need two coats for full coverage.
How To Chalk Transfer Without A Stencil
STEP 6: BLOCK #2
Block #2 was painted with two coats of Bunker Hill Blue.
Have you ever tried to paint a star without a stencil? I can’t do it!
So, I’ve found a really cool way to paint stars on my mini wood houses without using a stencil.
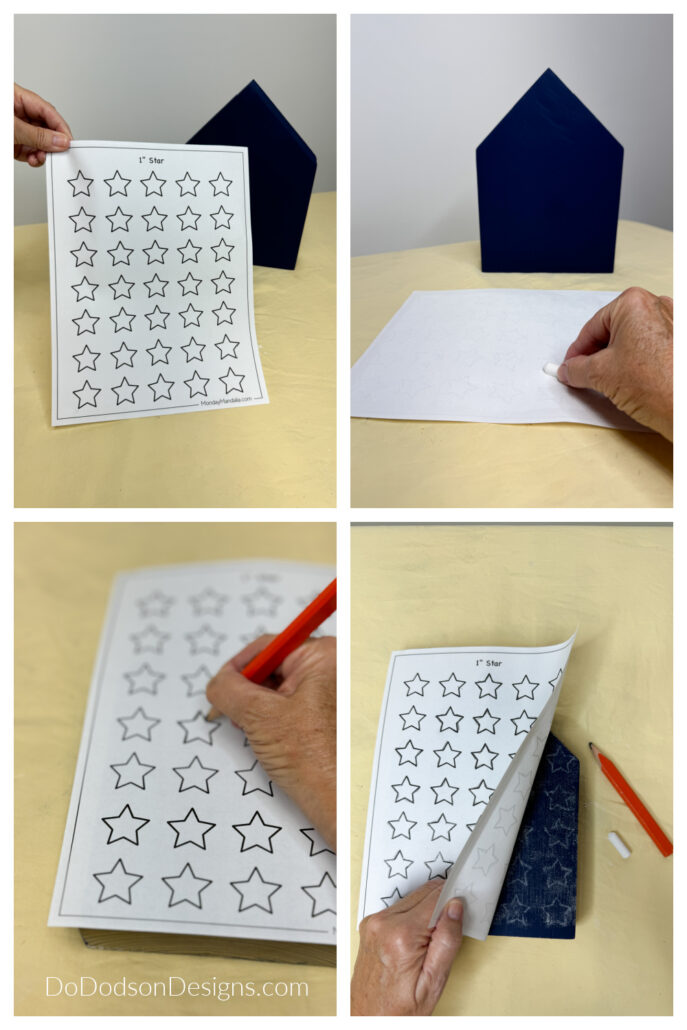
I found this 1-inch star printable for free. CLICK HERE to print it.
Print out the template design you want, rub the back of the paper template with a chalk stick, and then position it on the wood house with the chalk side down. Next, trace the design outline with a pencil.
Once the template is removed, you have a visible outline.
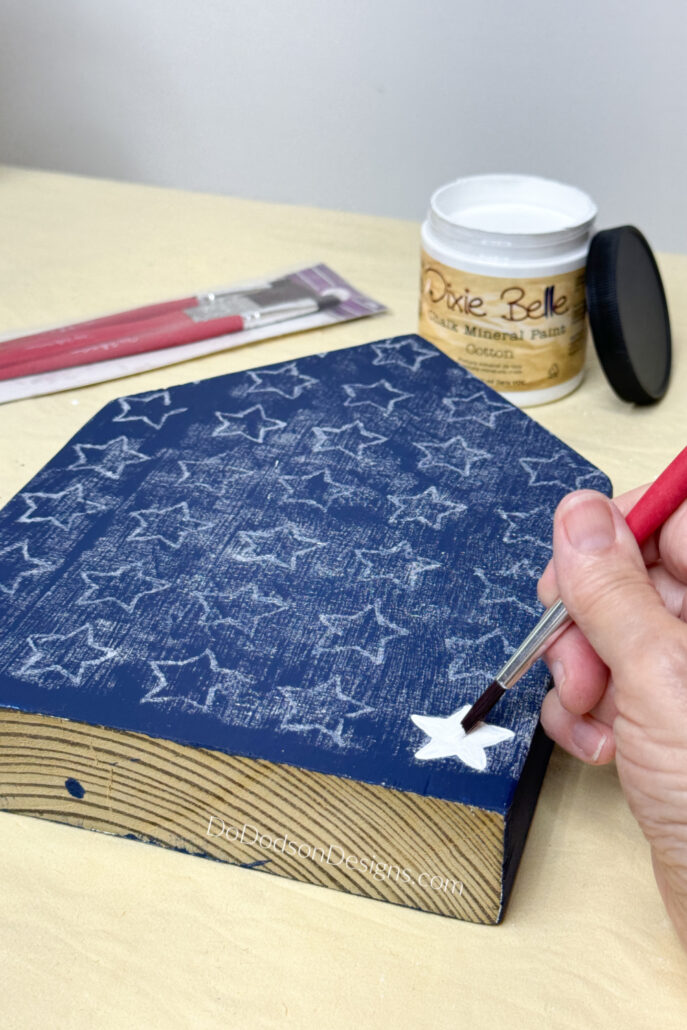
STEP 7:
Using a small artist brush, I painted each star by hand. It took a little longer than if I’d used a stencil, but I didn’t have one on hand. But it turns out this is a great way to quickly get the image of letters and shapes on your project without a stencil. If you’ve been looking for a way to get more creative, this is a fun way to do it!
Once the paint has dried, wipe away excess chalk with a damp towel or cloth.
Adding The Wood Roof
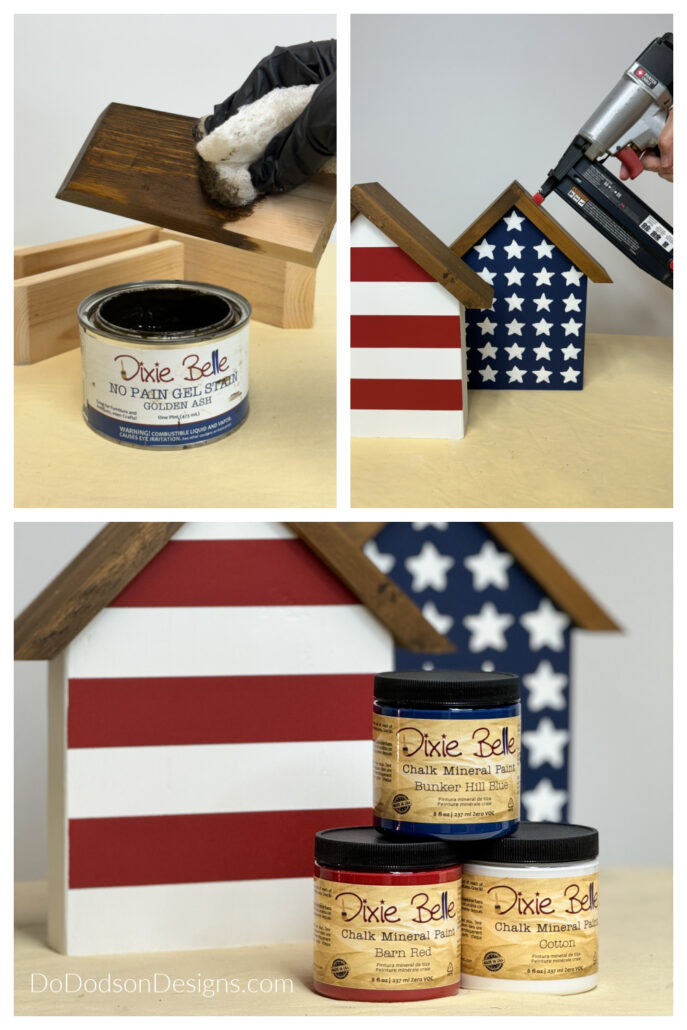
STEP 8:
These mini wood houses deserve an amazing roof!
“No Pain Gel Stain” in golden ash was the perfect finishing touch to my patriotic mini wood houses. The warm wood tone really compliments the red, white, and blue paint. I love how they turned out! I can’t wait to see how they look on my patio table this Fourth of July.
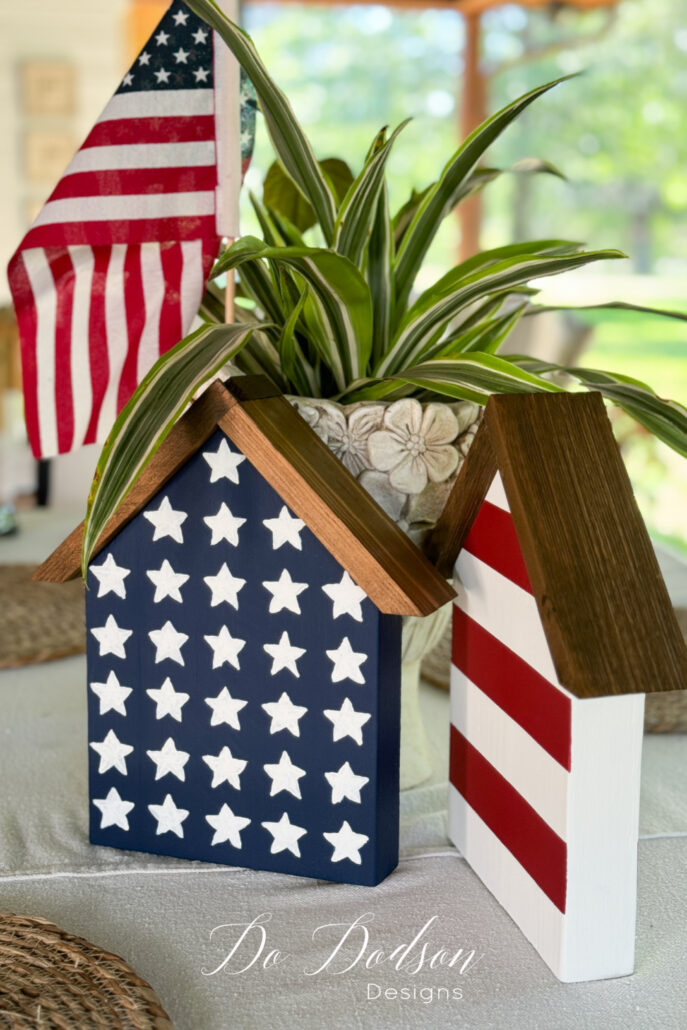
DIY Patriotic Mini Wood Houses
These little wood houses are stunning with patriotic red, white, and blue colors!
Look closely! This picture I took of my DIY mini wood houses is unintentionally profound. I had to chuckle after taking it. It’s not what I was going for, but it’s perfect for representing our current state of affairs in the USA. All I can say is pray without ceasing.
Can we take a moment to admire this planter I found at Bealls? I searched high and low for a link to purchase because I know you might want one, too. I had no luck, but I did find one I liked equally.
CLICK HERE to see another option.
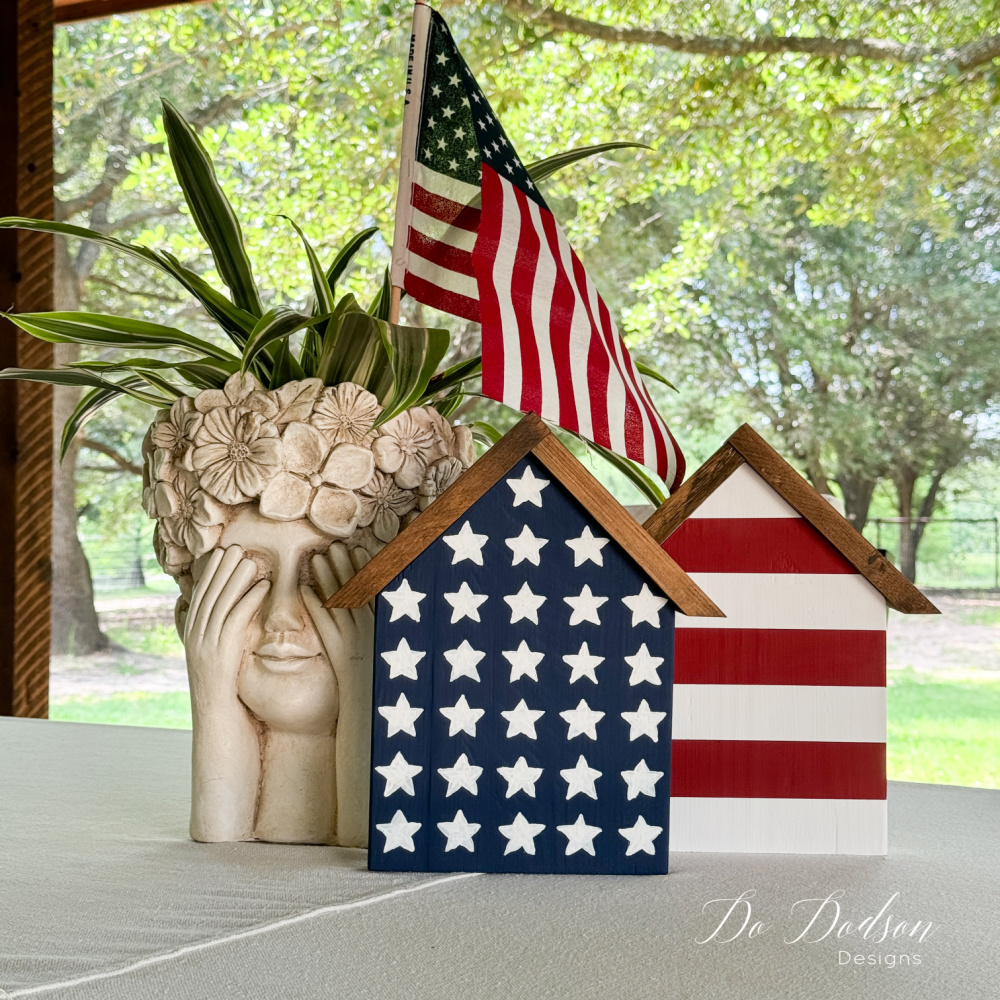
Oh, and let’s not forget about these tiny wooden houses. I used the same stain color to add another fun touch to my table display. The windows and doors were painted with an artist brush using black caviar chalk mineral paint.

Thanks for joining me today, and I hope this post has brought you the knowledge and inspiration you need to DIY your own mini wood houses.
If you enjoyed this project, please save it and share it with your crafty friends. Don’t forget to share your opinions and questions I may have missed in the comment section. I always love hearing from other like-minded crafters.
Did you know that it takes fewer muscles to smile than it does to frown? This is a great reminder to smile as often as possible and not be afraid to show joy. The world is a happier place when more people are smiling. So make an effort today to add brightness to someone’s day and yours. 🙂
Until the next project… xo, Do
Love this project Do, they turned out ahhh-dorable. I also love that planter! 🤗
Thanks, Denise! You know how I love using up those scrap pieces of wood. The planter makes me giggle. 🤭